Hosting a Resume on AWS
Welcome to this tutorial! Today, we'll guide you through hosting your own resume on AWS. This will not only showcase your resume in a professional way but also your technical prowess by leveraging the AWS platform. Once you've completed this project, creating a QR code to link to it, and adding it to your resume and business cards can be a great way to show potential employers your skills!
Prerequisites
Before we dive in, make sure you have the following:
- An AWS account
- Some HTML/CSS/JS knowledge to create your resume (or willing to learn)
- A local development environment (i.e., Visual Studio Code)
- Python installed on your local machine (for running a local server)
Note: In this project, the Route 53 domain, hosted zone, and CloudFront distribution will cost you approximately $20 a year to host. If you'd like to complete this project and stay entirely in the free-tier, but not have a custom domain and TLS encryption for hosting your resume, you can complete the first two steps only.
Table of Contents
- Creating Your Resume
- Setting up S3 for Hosting
- Setting up Route 53 Domain
- Configuring ACM for TLS Encryption
- Setting up CloudFront Distribution
- Testing Your Website
Creating Your Resume
If you don't have a HTML/CSS/JS resume already, don't worry! There are several templates available that you can modify to your needs. For this tutorial, I will be using a template called Cevee, but you can find a collection of other templates here. Once you've chosen a template, you can use a local IDE, like Visual Studio Code, to edit the code.
To preview your resume locally, navigate to your project root directory, run python3 -m http.server 8080, and go to http://127.0.0.1:8080 or http://localhost:8080 in your web browser.
Once you're satisfied with how your resume looks locally, it's time to move onto AWS.
Setting up S3 for Hosting
Amazon S3 is an excellent option for hosting static websites due to its robustness, scalability, and easy setup process. Here are the steps you need to follow to configure an S3 bucket for static website hosting:
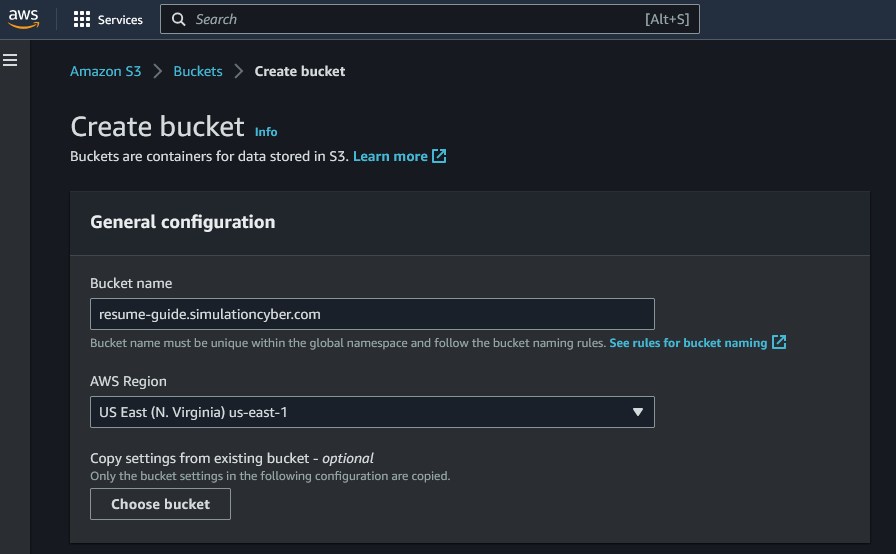
- Create a new S3 bucket: Log into your AWS console and navigate to the S3 service. Click "Create bucket", enter a unique name for your bucket, and select a region. The rest of the settings can be left at their defaults, then just click "Create bucket" at the very bottom.
Note: If you do plan on continuing all of these steps to setup a custom domain, it's best here to create a bucket with the exact same name as the domain you plan to use, i.e. Bucket name: resume-guide.simulationcyber.com.
- Enable static website hosting: After creating the bucket, click on its name to open it. Under the "Properties" tab, at the very bottom you will find the "Static website hosting" section. Click "Edit", select "Enable", and then provide 'index.html' as the "Index document" name. You may also enter 'error.html' in the "Error document" field if you have a custom error page.

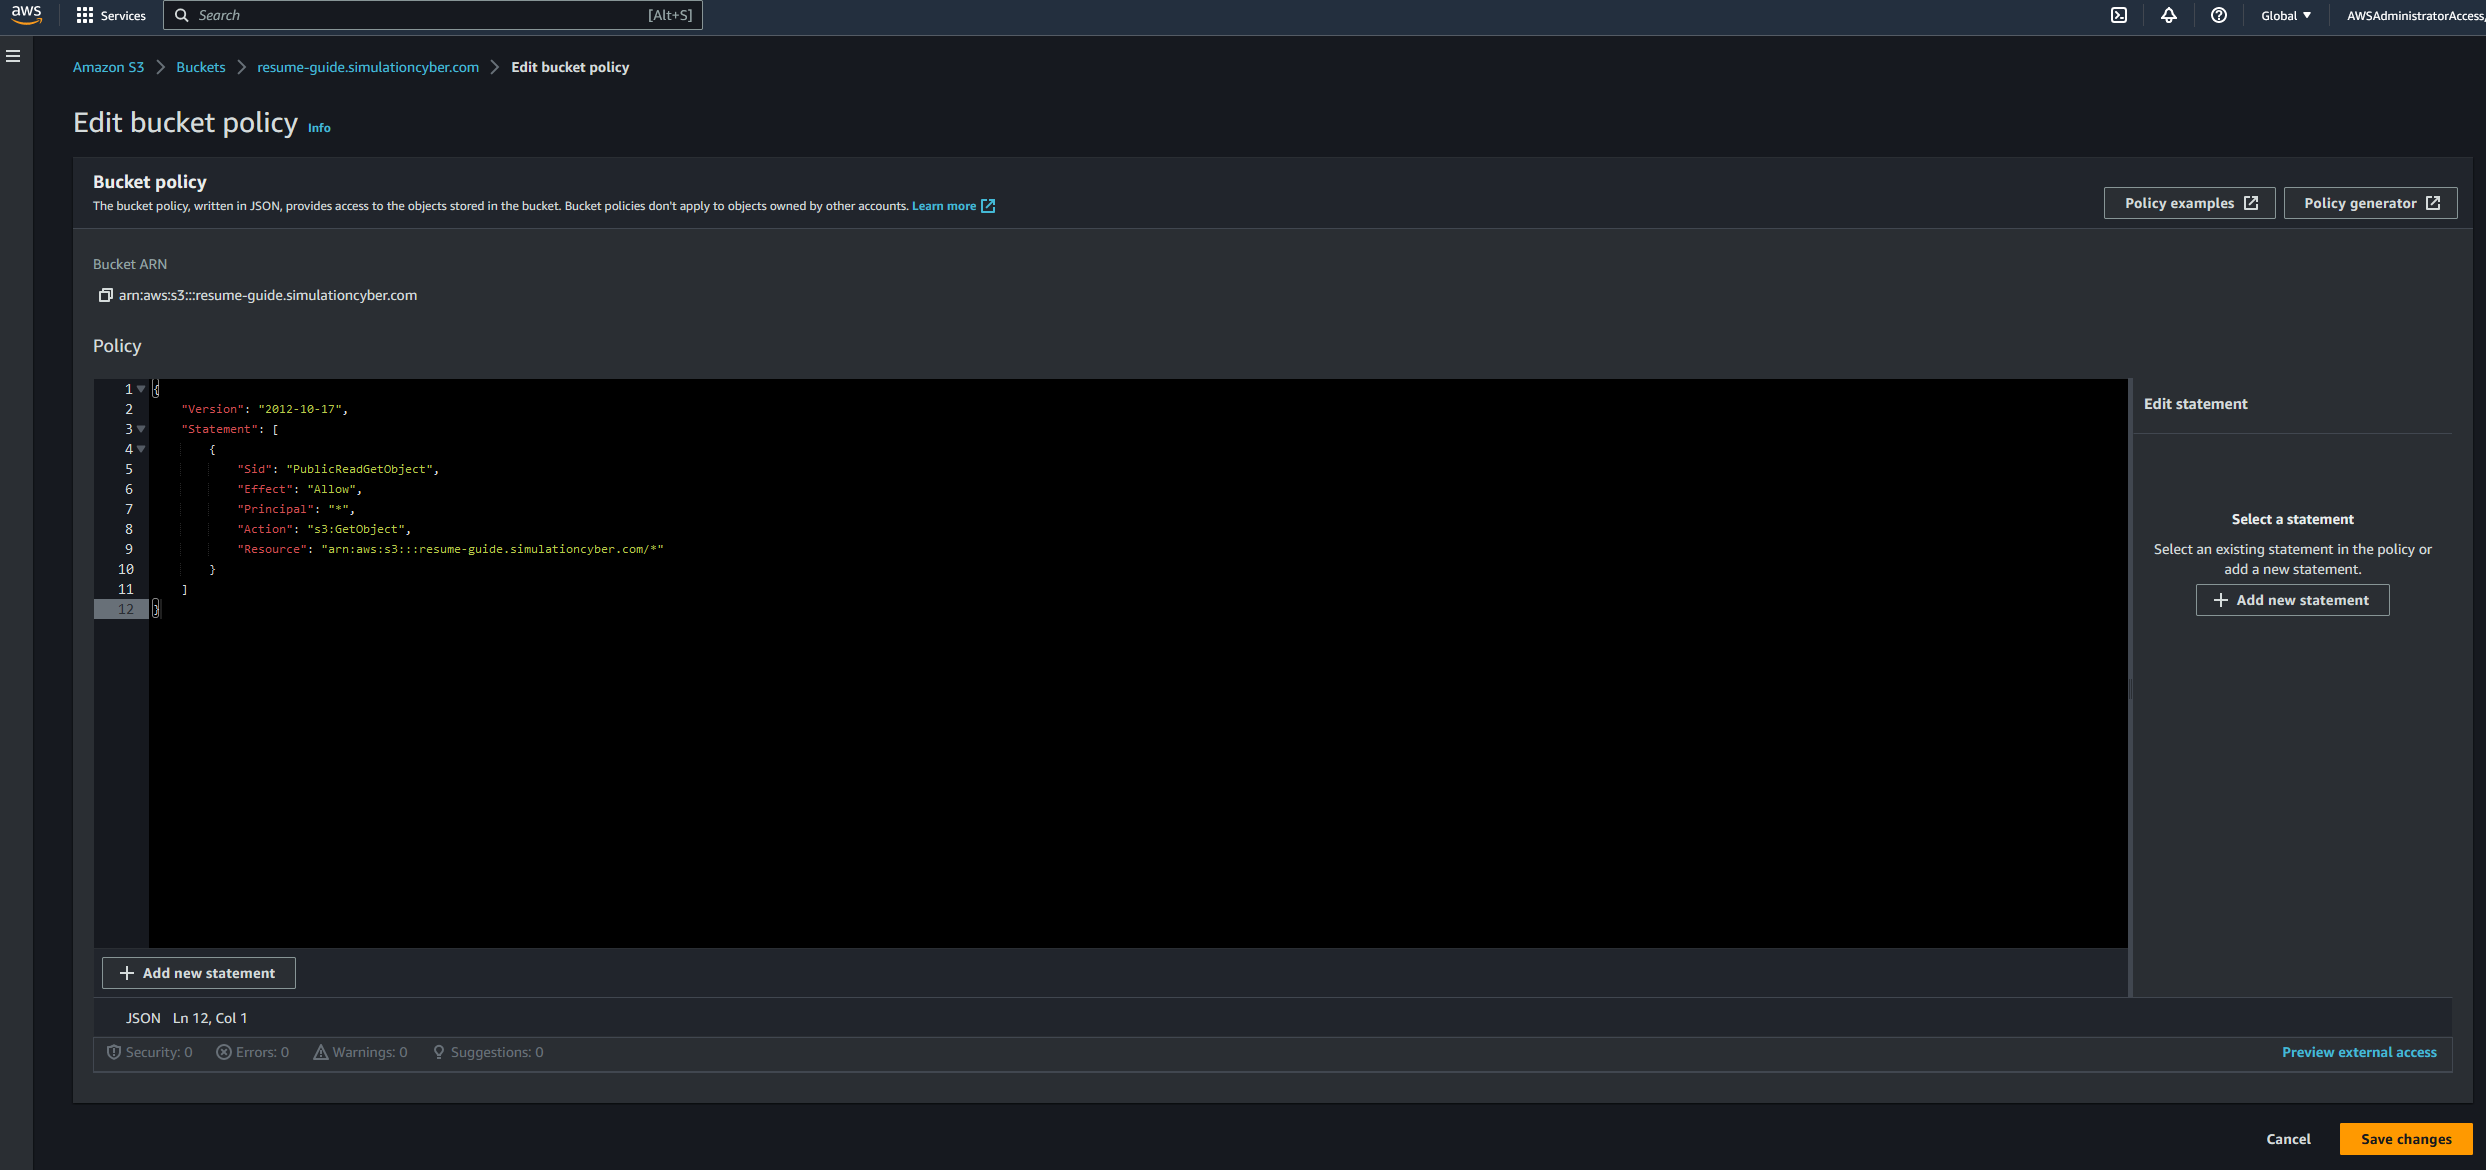
- Modify bucket policy to allow public read access: To initially test your website we can add a resource-based policy which allows public access, however later on if you choose to configure a CloudFront distribution to serve your website you can adjust the policy to instead only allow access to CloudFront. Navigate to the "Permissions" tab and click "Edit" under Block public access (bucket settings), then unclick block public access and ackknowledge and save. Once that's done your object can be public, but aren't just yet. Next click "Bucket Policy". Enter the following policy, replacing 'your-bucket-name' with the name of your bucket:
{
    "Version":"2012-10-17",
    "Statement":[{
        "Sid":"PublicReadGetObject",
        "Effect":"Allow",
        "Principal": "*",
        "Action":["s3:GetObject"],
        "Resource":["arn:aws:s3:::your-bucket-name/*"
        ]
    }
    ]
}

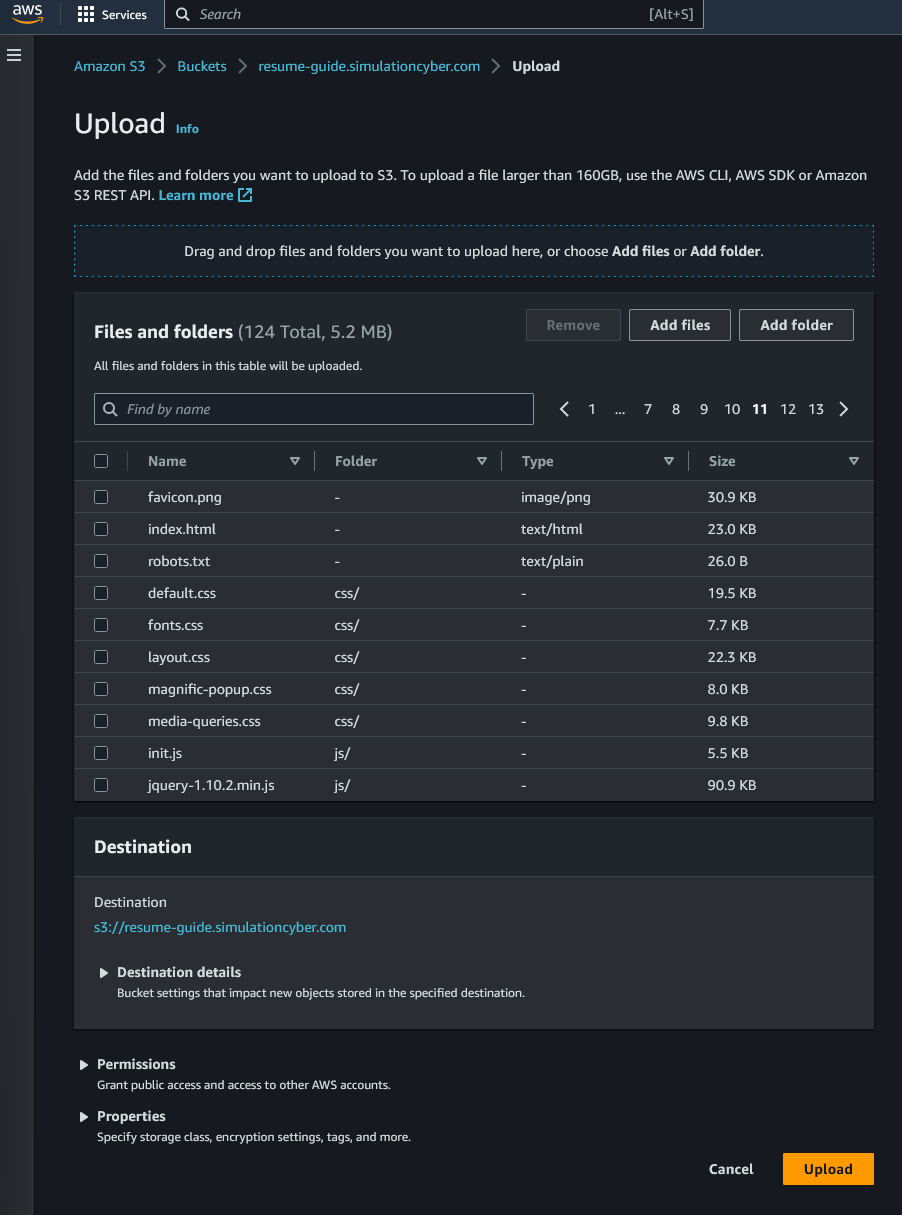
- Upload your website files: Now that your bucket is set up for hosting, you can upload your resume website files. Go to the "Objects" tab and click "Upload". You can drag and drop your files or click "Add files" to browse your file explorer. Click "Upload" to start the upload process. You can also upload using the AWS CLI, this blog post can guide you through setting up your CLI and recursively uploading and downloading S3 objects.
Note: If you want to be able to share your website, but don't necessarily want search engines indexing it, you can include a robots.txt file in the root directory of this folder with the following content inside:
User-agent: *
Disallow: /
- Test your website: Once the upload is complete, you can test your website. Navigate back to the "Properties" > "Static website hosting" section and click on the URL in the "Endpoint" section. This should open your resume website in a new browser tab (many browsers will force you to acknowledge it's an HTTP website before viewing).
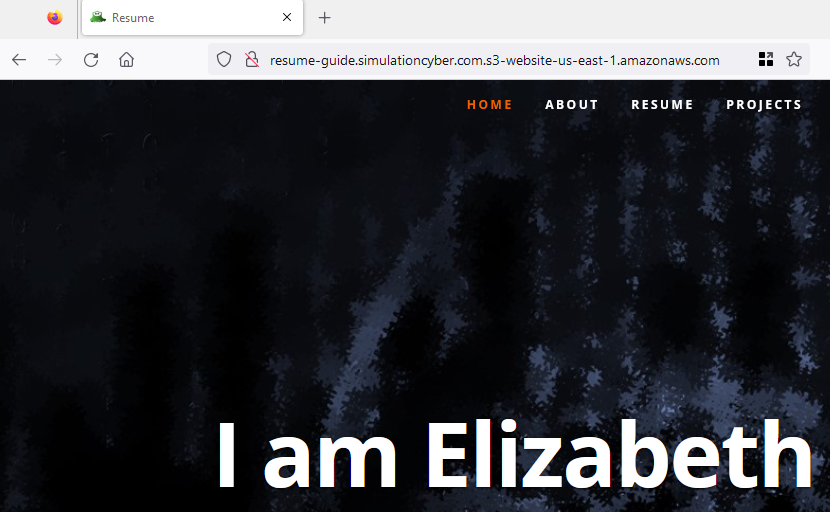
That's it! You have successfully set up an S3 bucket for hosting your static resume website. If you are okay with not having SSL encryption, or using a custom domain for your resume, that's it! You can use the URL provided in the S3 console to share your new website. If you'd like to set up those things, continue with this guide.
Setting up Route 53 Domain
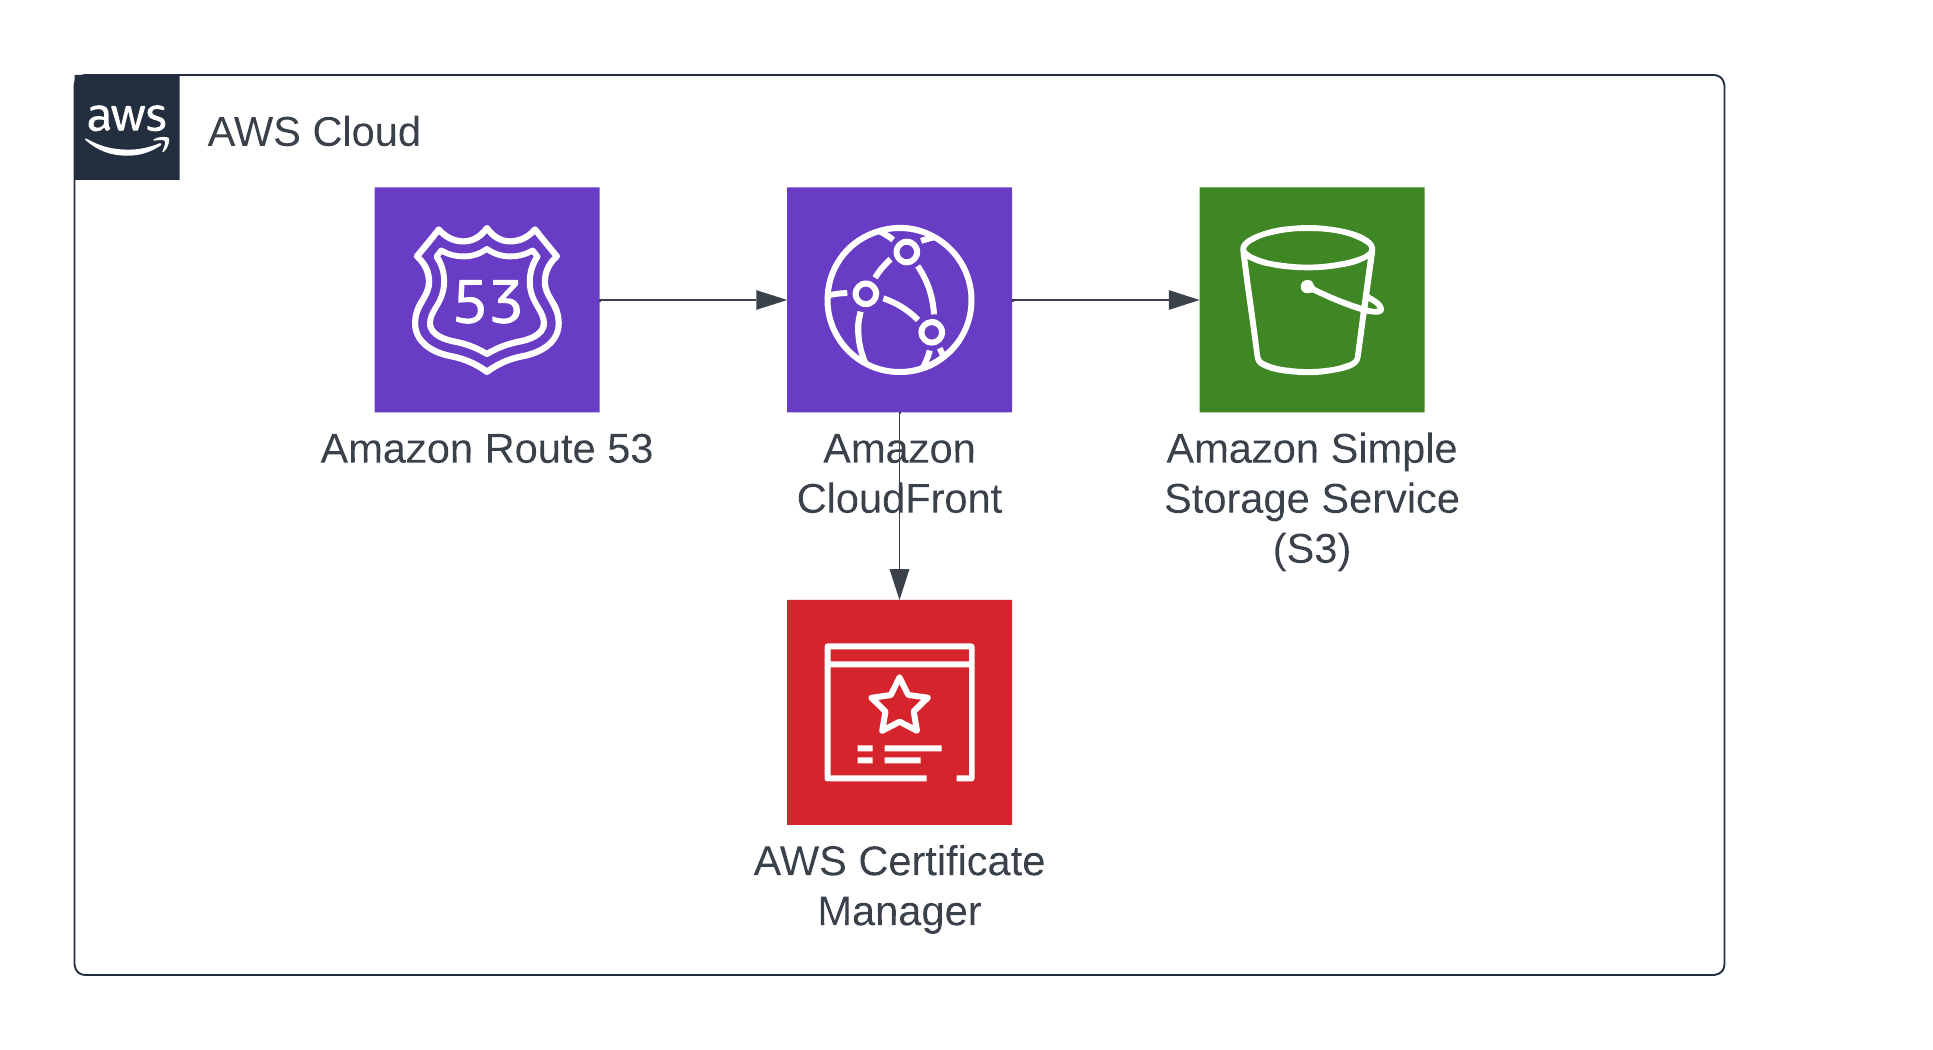
Using TLS encryption for a custom domain in CloudFront requires you to own a custom domain, so we'll jump ahead a bit in the architecture straight to Route 53. Route 53 is a scalable and highly available domain name system (DNS) web service by AWS. Here, we will create a domain and link it with our CloudFront distribution.
Note: If you already own a Route 53 domain, you can optionally setup your resume website using a subdomain such as https://resume-guide.simulationcyber.com. In this case you can skip to step 3 and set up the appropriate records in a similar fashion by prepending your subdomain by entering it in the box in the top left in the record creation page.
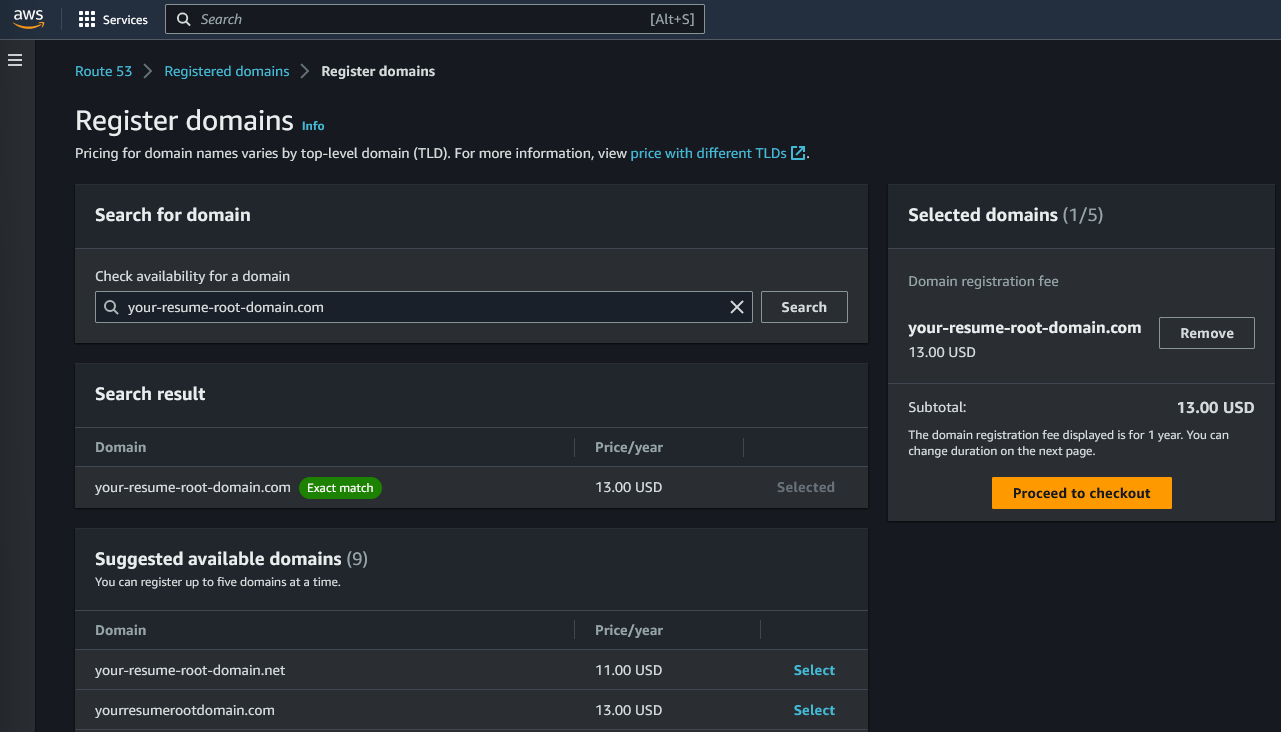
- Purchase a domain: In the Route 53 dashboard, click on "Registered Domains" and then "Register Domain". Enter the domain name you want to register and choose your domain extension (.com, .net, etc.). Follow the steps to purchase the domain. This process can take anywhere between a few minutes and a few hours, so it may be a good time to take a break and come back later.
Note: The annual fee for .com domains is $13, so you will pay this when initially registering your domain, and if you configure auto-renewal this charge will reoccur each year after purchase.
-
Create a hosted zone: After purchasing the domain, a hosted zone should automatically be created for it which you can find by clicking "Hosted Zones" on the left hand side of the Route 53 console.
-
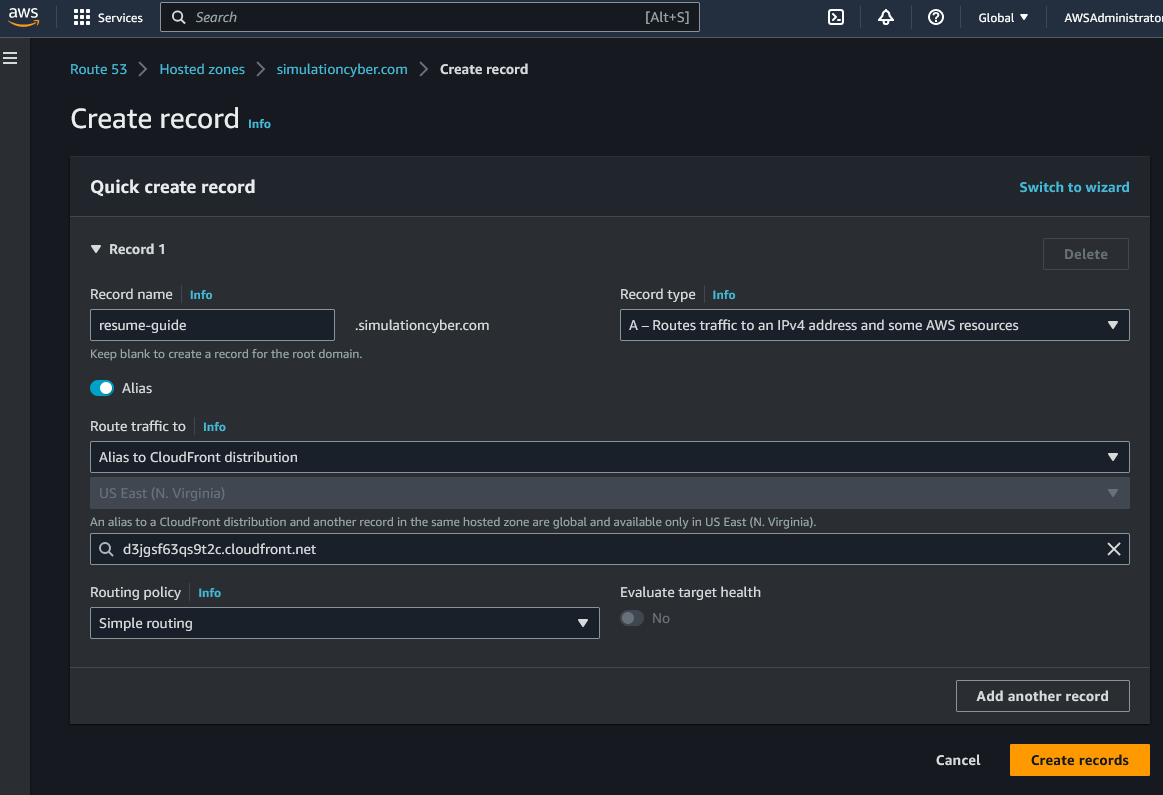
Create record sets: Within your new hosted zone, you'll need to create record sets that point to your CloudFront distribution. However, we still need to go create the CloudFront Distribution! Continue with subsequent steps and once you have your CloudFront distrubtion configured, complete this final step in Route 53.
-
Click "Create record". If you're using a subdomain enter it under Record name in the top left, else you can leave this blank. Leave the record type as 'A' and then click the button for Alias and two drop downs will appear. Choose CloudFront distribution for the first one, and for the second one, your distrubtion name should appear which will auto-fill your CloudFront's distribution domain name. Once this is set just click "Create records"
That's it! Your domain is now set up with Route 53. Due to DNS propagation, it might take a few minutes for these changes to take effect globally, so if your website isn't immediately accessible, don't worry - just give it some time.
Configuring ACM for TLS Encryption
Amazon Certificate Manager (ACM) provides and manages certificates needed for secure network communication. In this section, we'll configure an ACM certificate for your domain. Note that CloudFront requires the certificate to be created in the 'us-east-1' (N. Virginia) region.
-
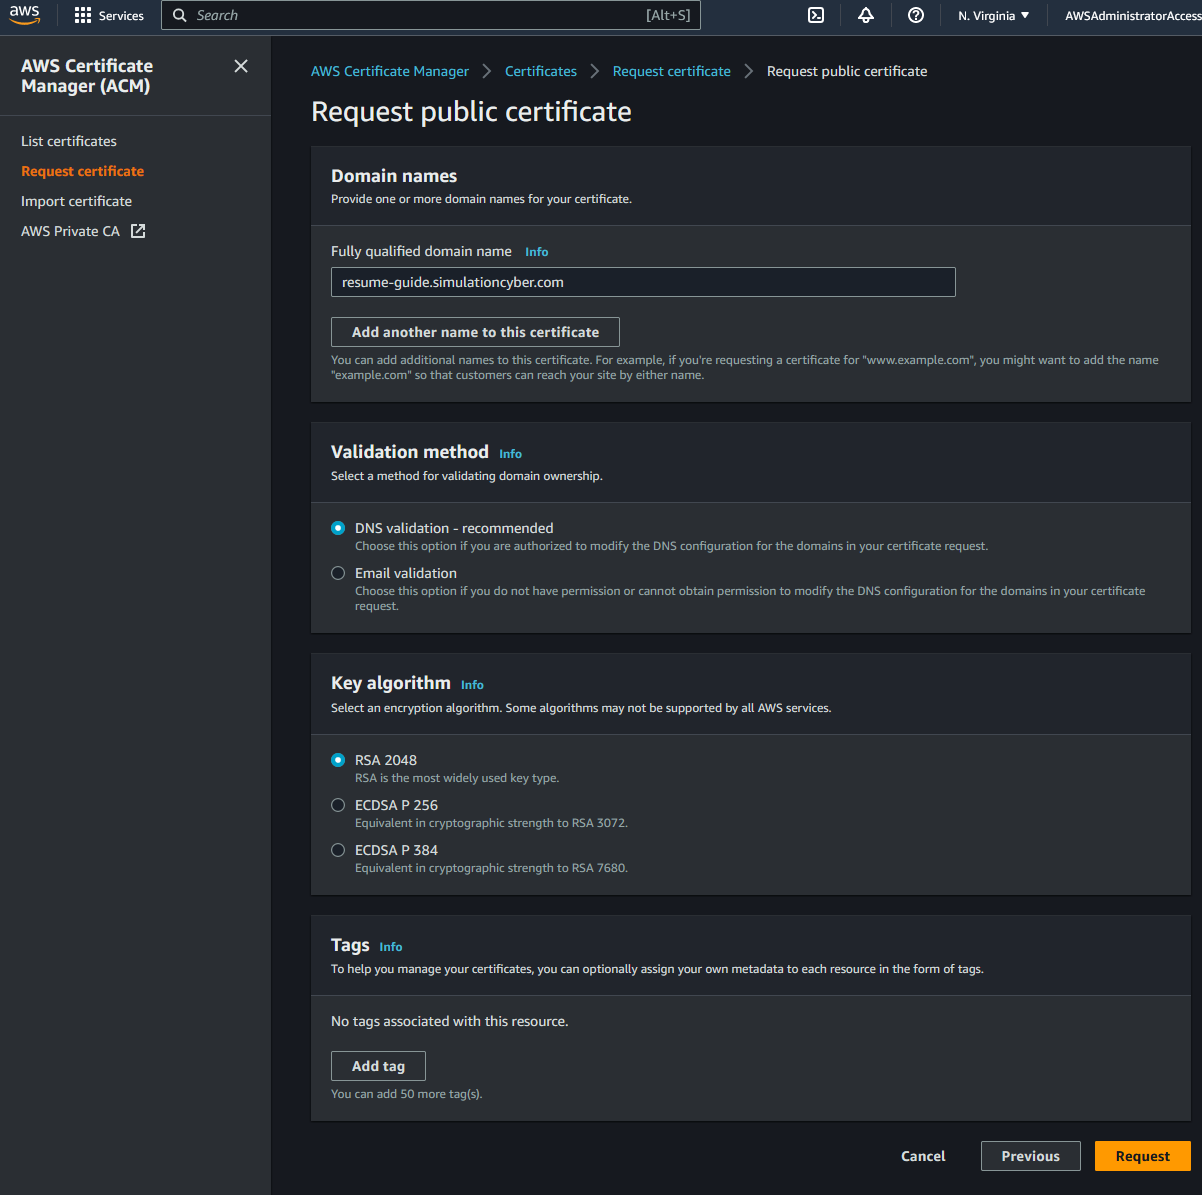
Request a certificate: Navigate to the ACM service in the AWS console, make sure you're in the 'us-east-1' region, then click "Request a certificate". Choose "Request a public certificate" and click "Next".
-
Add your domain names: In the domain name section, add the root domain and/or any subdomains you may be using in separate fields (for example, 'simulationcyber.com' and 'resume-guide.simulationcyber.com').
-
Choose a validation method: Choose DNS validation for easier setup and maintenance. Click "Review".
-
Review and request: Review your certificate details and click "Confirm and request".
- Validate the certificate: Now you have to validate ownership of the domains you specified. Expand the domains under "Pending validation", click "Create record in Route 53" and then "Create". AWS will automatically create the DNS records necessary for validation. Oddly, I find this step to be a bit buggy with brand new ACM requests, make sure you keep repeating this until you get the green banner saying records have been created.
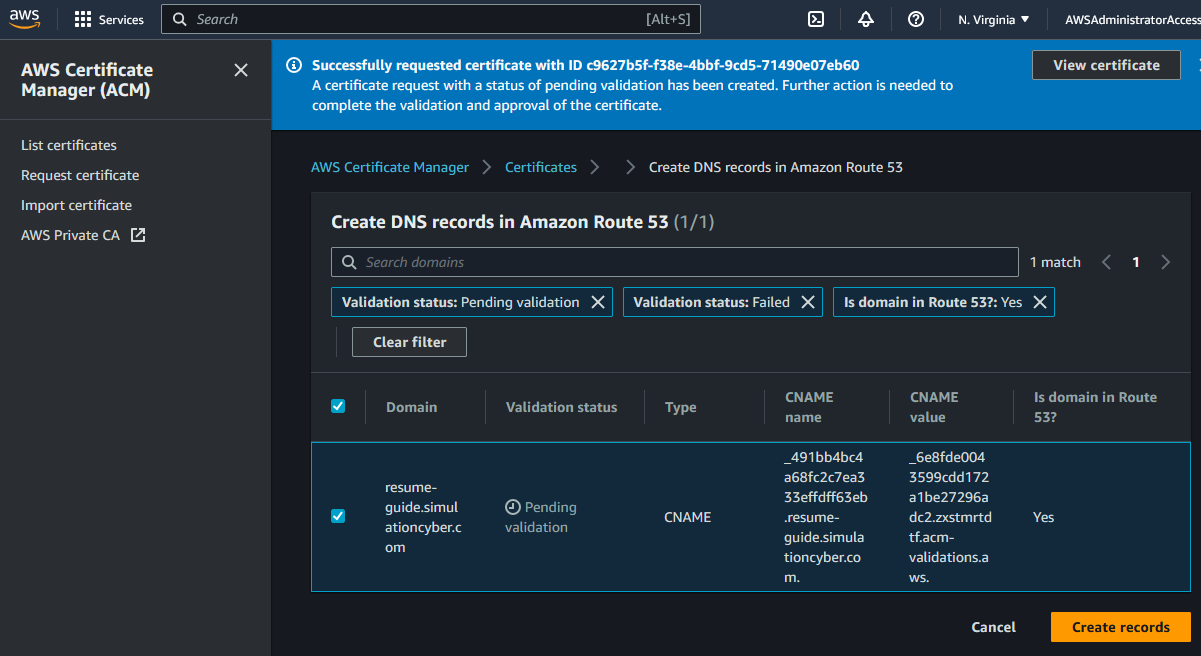
- Wait for the validation process: The validation process may take a little while (up to several hours). Once AWS has validated your domain ownership, your certificate status will change from "Pending validation" to "Issued".
Great job! Now you have a secure certificate for your domain issued by ACM. In the next step, we will use this certificate with our CloudFront distribution to ensure secure connections to your resume website.
Setting up CloudFront Distribution
CloudFront is a content delivery network (CDN) provided by AWS, which can serve your content from edge locations closer to your users, improving load times and providing a smoother user experience. To set up CloudFront distribution for your S3-hosted website, follow these steps:
-
Create a new CloudFront Distribution: Navigate to the CloudFront service from your AWS Management Console and click "Create Distribution".
-
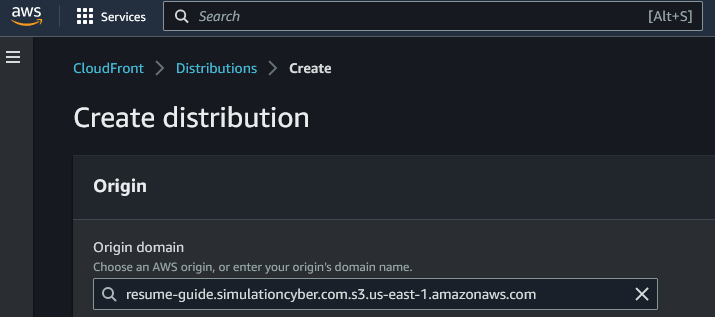
Specify your S3 bucket as the origin: On the next page, you will be asked to specify the origin settings. For the "Origin Domain Name", you will see a list of your S3 buckets. Select the bucket where you are hosting your resume website. Leave the "Origin ID" as it auto-fills.
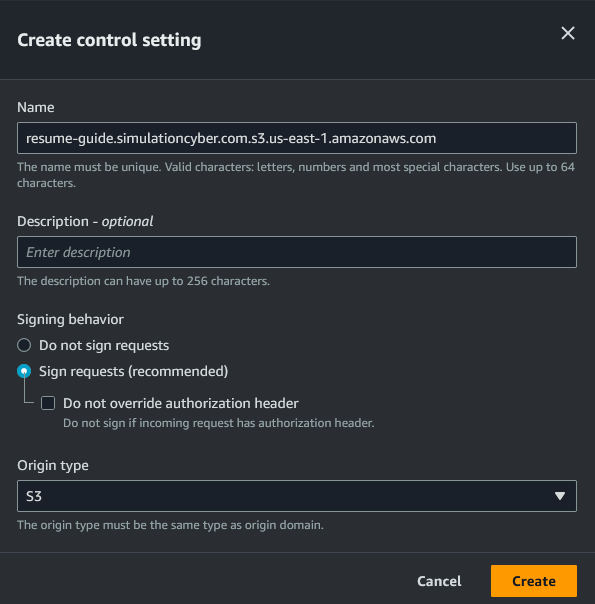
- Setup Origin Access Control: In the section "Origin access" select "Origin access control settings (recommended)." Then, next to the new drop down click "Create control setting," leave everything as default and click "Create." Then click on the drop down and make sure your new control setting is selected.
Note: Once the CloudFront is created you will need to take the policy statement CloudFront creates and modify the bucket policy on the S3 bucket to use this newly generated policy for CloudFront.
-
Configure distribution settings: Scroll down to the "Default Cache Behavior Settings". Make sure that "Redirect HTTP to HTTPS" is selected to ensure secure connections to your site. You can leave the rest of the settings at their defaults in this section.
-
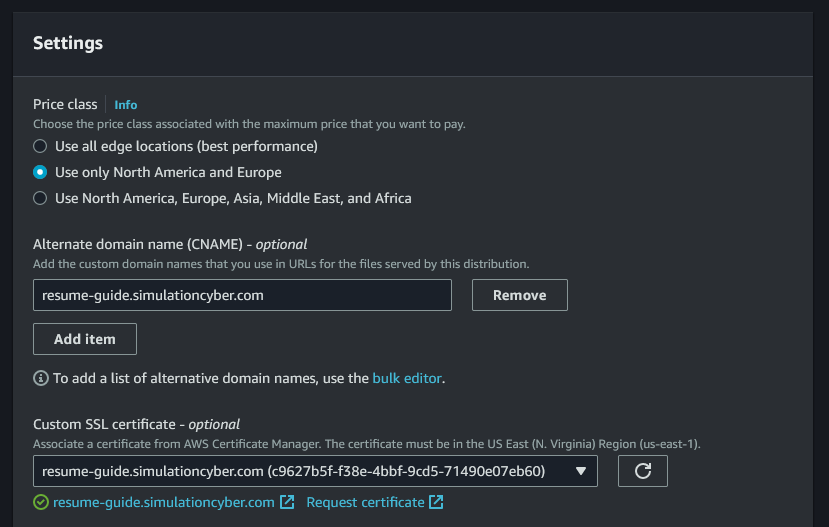
Set up the custom domain and SSL certificate: Under the section just labeled "Settings" at the very end, I recommend adjusting the price class to the option that makes the most sense for you. Then, add your custome domain into the box under Alternate domain name (CNAME). Finally, Choose the certificate that you created with ACM (make sure the certificate is in the 'us-east-1' region, as CloudFront only sees those).
-
Set the default root object: Also under "Settings", fill in "Default Root Object" with 'index.html.'
-
Review and create the distribution: Finally, review your settings and click "Create Distribution". It might take a while for your distribution to be deployed.
-
Update S3 Bucket Policy: Once you create the distribution a banner will appear at the top of the page with a button that says "Copy Policy." Click that and pop back over to your S3 bucket, inside of permissions, and edit the bucket policy and paste this over your old policy and save. Then edit the public access to reset it to block all public access as seen below:

- Copy the Distribution Domain Name: Once the distribution is deployed, return to complete the final step in the section on Setting up Route 53 Domain.
That's it for setting up your CloudFront distribution! Now your site is accessible worldwide with lower latency and secured with SSL. Additionally, with OAI setup, direct access to your S3 bucket is now restricted providing an additional layer of security.
Testing Your Website
After all configurations, you should now be able to access your resume using the domain name you configured. Congratulations, you have successfully hosted your resume on AWS!
Conclusion
Great job on making it to the end! You've now successfully hosted your resume on AWS using a variety of services, such as S3 for storage, CloudFront for delivery, ACM for SSL encryption, and Route 53 for domain management.
Having a secure, fast-loading, and professional-looking resume website is an excellent way to stand out and showcase your skills and experiences. By hosting your website on AWS, you've also demonstrated your ability to utilize and combine multiple AWS services, a skill highly valued in many tech-based roles.
If you'd like to use this website to advertise your skills to possible employers you can create a QR code to put on your resume, business cards, etc.!
But this is just the start! There are many other AWS services that you can utilize to enhance your website further. In upcoming content, we'll explore how to use AWS Amplify to set up a CI/CD pipeline for your website. This will allow you to easily update your website and ensure that your changes are smoothly integrated and deployed.
We'll also take a look at how you can use an API Gateway and Lambda function to add more functionality to your website. For instance, you might want to add a contact form to your resume site, so recruiters can reach out to you directly from the page. By setting up a serverless backend with API Gateway and Lambda, you can easily make this happen.
Stay tuned for these exciting next steps in your AWS journey, and keep up the excellent work!
I hope you found this tutorial helpful. If you have any questions, feel free to reach out!