AWS CLI 101

AWS has a command line interface tool which you can use to programmatically manage your entire AWS infrastructure. In some cases using the console is a simpler method because it more or less walks you through the process of configuring, creating, and managing your AWS resources. However, in other cases the command line tools can be more efficient, more powerful, or sometimes your only option, so it's important to know the basics of how to use it. I'll start here by walking through installing and configuring your AWS CLI, some basics on how to find commands, or understand usage of those commands, then provide some specific usage examples for several common AWS services including: EC2, Lambda, S3 and IAM.
Prerequisites: AWS Account with an IAM account or permission to create an IAM account. If you do not have an AWS account, create one here.
Table of Contents
Part 1: Install and Configure AWS CLI
Part 2: Basic Usage of AWS CLI
Part 3: EC2 Commands
Part 4: Lambda Commands
Part 5: S3 Commands
Part 6: IAM Commands
Part 1: Install and Configure AWS CLI
Start by going to this website and follow the instructions for your particular operating system (Linux, MacOS, or Windows). Here's a basic cheat sheet for simplicity:
- Linux:
curl "https://awscli.amazonaws.com/awscli-exe-linux-x86_64.zip" -o "awscliv2.zip" #For Linux ARM replace <x86_64> with <aarch64>
unzip awscliv2.zip
sudo ./aws/install
- Windows:
msiexec.exe /i https://awscli.amazonaws.com/AWSCLIV2.msi - MacOS:
Throw computer out
Buy Linux or Windows PC
See above
If you MUST use MacOS here:
curl "https://awscli.amazonaws.com/AWSCLIV2.pkg" -o "AWSCLIV2.pkg"
sudo installer -pkg AWSCLIV2.pkg -target /
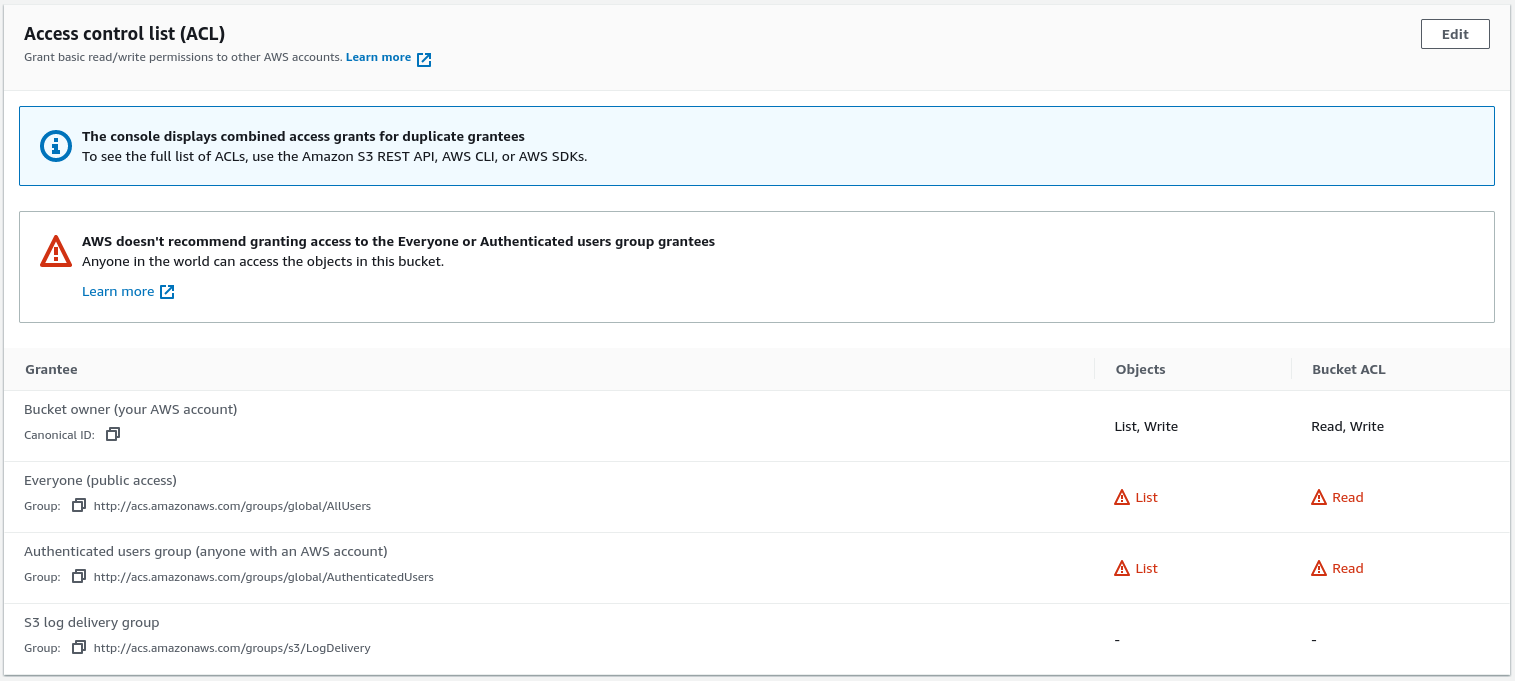
For some AWS commands the configuration steps may be unnecessary. For example, S3 buckets can be configured to allow access to the bucket owner (by default), everyone (public access), or authenticated users groups (anyone with an AWS account). This is not an exhaustive list of how S3 permissions can be configured, just some basics. This means that at this point the AWS CLI you've just installed can already be used to access buckets configured to give access to "Everyone". The screenshot below shows an example of what the ACL under the permissions tab might look like for a publicly accessible bucket.
For anything else that does require an account with appropriate permissions we'll configure AWS CLI to use those access credentials.
If you haven't already the first step is to use the console interface to either create a new IAM user, or use an existing one as long as you have permission to create access keys. Once you have an account you want to use click on it and go to the 'Security credentials' tab then click 'Create access key.' This will generate two strings for you, an Access key Id, and a Secret access key, save them temporarily but keep them close hold because if they get into the wrong hands then they can be used to wreak all kinds of havoc on your AWS account.
Back in the command line just type:
aws configure
aws configure --profile dev-accountYou'll be prompted for 4 things, the Access Key Id, Secret Access Key, Default region name, and Default output format. The first two come from the IAM console where you just generated an access key. The default region should be set to wherever the largest portion of your assets are or you plan to put them, however even if you're using multiple regions you can just specify that in the commands you run, this just saves you some effort if you're working mostly in one. The last one is the output format of unstructured data that you might pull with your commands, I highly recommend json, but you can also enter yaml, yaml-stream, text, or table. Here's an example of what your configuration could look like:
AWS Access Key ID [None]: AKIA**************
AWS Secret Access Key [None]: ************************************
Default region name [None]: us-east-1
Default output format [None]: json
Part 2: Basic Usage of AWS CLI
Like most well documented command line tools, you can actually just type in aws and get some basic information about how to use this command. The help pages are nested so you can basically just tack help onto the end of whatever you've built so far and good chance it'll be able to give you some relevent information. The basic format is:
aws help
aws <command> help
aws <command> <subcommand> help
The first one is helpful if you want to see options which can be used with any (or nearly any) command such as the --profile option to specify which credential profile you want to use, you can also specify --region for any asset or service which is not in your profile default region, and --output if the command you're running is better received in something other than your default output. aws help also includes an exhaustive list of services that are available to be controlled via the command line.
Part 3: EC2 Commands
EC2 is a core component of AWS services, this service is used to launch virtual machines with a variety of different hardware and software configurations. Once again, you can orient yourself initially to aws ec2 commands using aws ec2 help. To view the full documentation and more information on each command go here. Let's work through some basic usage of some common ec2 functions.
- Create a key pair, subcommand
create-key-pair- Required argument:
- --key-name <string>
- Useful optional argument(s):
- --key-type <string> (rsa or ed25519)
- Ex:
aws ec2 create-key-pair --key-name <your-key-name>
- Required argument:
- Create security group, subcommand
create-security-group- Required argument(s):
- --description <string> (informational)
- --group-name <string>
- Useful optional argument(s):
- --vpc-id <string>
- Ex:
aws ec2 create-security-group --group-name ExampleGroup --description "Example Security Group Description"
- Required argument(s):
- Create instance, subcommand
run-instances- Required argument(s):
- --image-id <string> (ID of the AMI used to launch, should start with ami-)
- --key-name <your-key-name> (technically not required but enables ssh access)
- --instance-type <string> (use help command to see all types)
- Useful optional argument(s):
- --count <int> (defaults to 1)
- --security-group-ids <single id or list>
- --subnet-id <string>
- Ex:
aws ec2 run-instances --image-id ami-00ae10124674e644d --count 1 --instance-type t2.micro --key-name ExampleKeyPair
- Required argument(s):
aws ec2 describe-images --owner amazon --filters "Name=description,Values=*Ubuntu Server 20*" --query 'Images[*].[ImageId,Description]' --output text- Stop instance, subcommand
stop-instances- Required argument(s):
- --instance-ids <value>
- Useful optional argument(s):
- --force / --no-force
- --hibernate
- Ex:
aws ec2 stop-instances --instance-ids i-*************
- Required argument(s):
- Start instance, subcommand
start-instances- Required argument(s):
- --instance-ids <value>
- Ex:
aws ec2 start-instances --instance-ids i-************
- Required argument(s):
- List instances, subcommand
describe-instances- Required argument(s): None
- Useful optional argument(s):
- --filter <value>
- --instance-ids <value>
- Ex:
aws ec2 desribe-instances
- Terminate instances, subcommand
terminate-instances- Required argument(s):
- --instance-ids <value>
- Ex:
aws ec2 terminate-instances --instance-ids i-**********
- Required argument(s):
Part 4: Lambda Commands
Lambda allows you to run code without having configured the underlying infrastructure to support it. Generally speaking lambda is meant for small(ish) snippets of code that run a specific task based on a variety of triggers. Use aws lambda help to see the help page for this subcommand, or go here to see the full documentation.
- Create function, subcommand
create-function- Required argument(s):
- --function-name <value>
- --role <\value> (ARN of the functions IAM role)
- Useful optional argument(s):
- --runtime <\value> (required if deployment package is .zip, value should be the language and version, i.e. python3.9, nodejs14.x)
- --code (supplied from S3 bucket, syntax: S3Bucket=string,S3Key=string,S3ObjectVersion=string,ImageUri=string)
- --zip-file <\file-location>
- --handler <\value> (function within your code used to run your lambda)
- Ex:
aws lambda create-function --function-name ExampleFunction --runtime python3.9 --zip-file /home/examplefunction.zip --handler lambda_handler --role arn:aws:iam:******:role/service-role/ExampleFunction-role-*****
- Required argument(s):
- List functions, subcommand
list-functions- Required argument(s): None
- Ex:
aws lambda list-functions
- Invoke function, subcommand
invoke- Required argument(s):
- --function-name <value>
- Useful optional argument(s):
- --payload
- --invocation-type <value> (RequestResponse invokes synchronously, Event invokes asynchronously)
- Ex:
aws lambda invoke --function-name ExampleFunction --payload '{"key":"value"} response.json
- Required argument(s):
- Delete function, subcommand
delete-functions- Required argument(s):
- --function-name <value>
- Ex:
aws lambda delete-function --function-name ExampleFunction
- Required argument(s):
- Get function, subommand
get-function- Similar to list-function but also returns a pre-signed URL which allows you to download the deployment package for 10 minutes
- Required argument(s):
- --function-name <value>
- Ex:
aws lambda get-function --function-name ExampleFunction
Part 5: S3 Commands
S3 buckets are the most basic storage solution offered by AWS. Buckets are the root folder, whose name must be globally unique because each AWS bucket automatically comes with a URL which can be used to access it via a web browser for anyone with appropriate permissions. This URL is https://bucket-name.s3.region.amazonaws.com where bucket-name and region are replaces as appropriate, and region is sometimes optional. Aditionally, you can append the name of any object or folder within this bucket to view the contents of either via the same method.
The aws s3 command line includes the following commands:
- cp (copy, syntax cp <source> <destination>)
- ls (list)
- mb (make bucket)
- mv (move file)
- presign (generate pre-signed URL for s3 object, default 1hr, max 7 days)
- rb (remove bucket, use --force to delete non-empty buckets)
- rm (delete object)
- sync (syncs directories)
- website (set the website config for a bucket)
Lets run through some specific examples:
- Copy
- Copy (upload) local file to s3:
aws s3 cp example.txt s3://bucket-name/example.txt - Copy s3 object to local system:
aws s3 cp s3://bucket-name/file.txt ./ - Recursively copy s3 objects to local system:
aws s3 cp --recurse s3://bucket-name ./ - Recursively copy s3 objects to local system without credentials configured (requires region):
aws s3 cp --recursive --no-sign-request --region <region> s3://bucket-name ./
- Copy (upload) local file to s3:
- List
- List all my buckets:
aws s3 ls - List root contents in specific s3 bucket:
aws s3 ls s3://bucket-name - Recursively list all contents in specific s3 bucket:
aws s3 ls --recursive s3://bucket-name
- List all my buckets:
- Make
- Make a bucket:
aws s3 mb s3://new-bucket - Make bucket in specific region:
aws s3 mb s3://new-bucket --region us-east-2
- Make a bucket:
- Delete
- Delete empty bucket:
aws s3 rb s3://bucket-name - Delete non-empty bucket:
aws s3 rb s3://bucket-name --force - Delete object:
aws s3 rm s3://bucket-name/object-name.ext - Delete all objects in bucket/folder:
aws s3 rm s3://bucket-name/folder --recurse - Delete objects except ones which match a filter (i.e. .txt files): `aws s3 rm s3://bucket-name --recursive --exclude "*.txt"
- Delete empty bucket:
- Create pre-signed URLs
- Create pre-signed URL for an object:
aws s3 presign s3://bucket-name/object-name.ext - Create URL with max expiration time:
aws s3 presign s3://bucket-name/object-name.ext --expires-in 604800
- Create pre-signed URL for an object:
Part 6: IAM Commands
IAM is Identity and Access Management. As the name might suggest it's the service used to manage users, groups, roles, and policies which collectively control permissions in AWS. The significance of this design is the granularity by which you can control those permissions. For example, many services within AWS break down the possible actions into dozens or hundreds of categories. I could create a policy which gives a user or group access to complete all those actions on a particular resource (like an s3 bucket), however, I can also very specifically say that this user or group should have permission to maybe read and list objects in a specific folder of a specific s3 bucket (even specific objects within the bucket). When a user with those permissions navigates to the s3 console, or attempts to use the s3 command line, only those commands or actions will work, and not only will they not be able to touch other objects, they won't even be able to see them. The commands available for IAM within the AWS CLI are extensive and powerful, so I'll just focus on examples in a few categories which may be the most commonly used.
- Create
- Create User:
aws iam create-user --user-name ExampleUser - Create Group:
aws iam create-group --group-name ExampleGroup - Create Role:
aws iam create-role --role-name ExampleRole --assume-role-policy-document /home/assume-role-policy.json - Create Policy:
aws iam create-policy --policy-name ExamplePolicy --policy-document /home/policy.json - Create Access Key for User:
aws iam create-access-key --user-name ExampleUser
- Create User:
- Add/Attach/Remove
- Add User to Group:
aws iam add-user-to-group --user-name ExampleUser --group-name ExampleGroup - Attach Policy to User:
aws iam attach-user-policy --user-name ExampleUser --policy-arn arn:aws:iam::*********:policy/ExamplePolicy - Attach Policy to Role:
aws iam attach-role-policy --role-name ExampleRole --policy-arn arn:aws:iam::**********:policy/ExamplePolicy - Attach Policy to Group:
aws iam attach-group-policy --group-name ExampleGroup --policy-arn arn:aws:iam::**********:policy/ExamplePolicy
- Add User to Group:
- List/Get
- List all users:
aws iam list-users - Get Info on User:
aws iam get-user --user-name ExampleUser - List all groups:
aws iam list-groups - Get Info on Group:
aws iam get-group --group-name ExampleGroup - List all roles:
aws iam list-roles - Get Info on Role:
aws iam get-role --role-name ExampleRole - List all policies:
aws iam list-policies - Get Info on Policy:
aws iam get-policy --policy-arn arn:aws:iam::**********/policy/ExamplePolicy
- List all users:
- Delete
- Delete User:
aws iam delete-user --user-name ExampleUser - Delete Group:
aws iam delete-group --group-name ExampleGroup - Delete Role:
aws iam delete-role --role-name ExampleRole - Delete Policy:
aws iam delete-policy --policy-arn arn:aws:iam::**********:policy/ExamplePolicy - Delete Access Key:
aws iam delete-access-key --access-key-id AKID**************** --user-name ExampleUser
- Delete User:
Policies within AWS are what actually defines permissions for all entities. You can create a policy then attach it to a user, group, or role, then attach users to groups, etc.. You can even create in-line policies for users which don't exist outside of the config for that user specifically. Policies can be configured not only to allow or disallow access to any service, asset, action, or resource within AWS, but even allows other restrictions like ranges of times or dates, and access from specific IPs or regions. Each policy has the basic breakdown which includes Version, and one or more Statements which then include Effect, Action, Resource, and sometimes Condition. Here's a basic example of a policy which grants access to list objects in an s3 bucket for a period of one month:
{
    "Version": "2012-10-17",
    "Statement": [
        {
            "Effect": "Allow",
            "Action": ["s3:ListBucket"],
            "Resource": ["arn:aws:s3:::bucket-name"],
            "Condition": {
                "DateGreaterThan": {"aws:CurrentTime": "2022-06-01T00:00:00Z"},
                "DateLessThan": {"aws:CurrentTime": "2022-06-30T23:59:59Z"}
            }
        }
    ]
}
Conclusion
If you've made it this far, you're ready to get starting learning how to effectively use the AWS Command Line Interface. Congratulations and good luck!