Automating AWS Prowler Scans
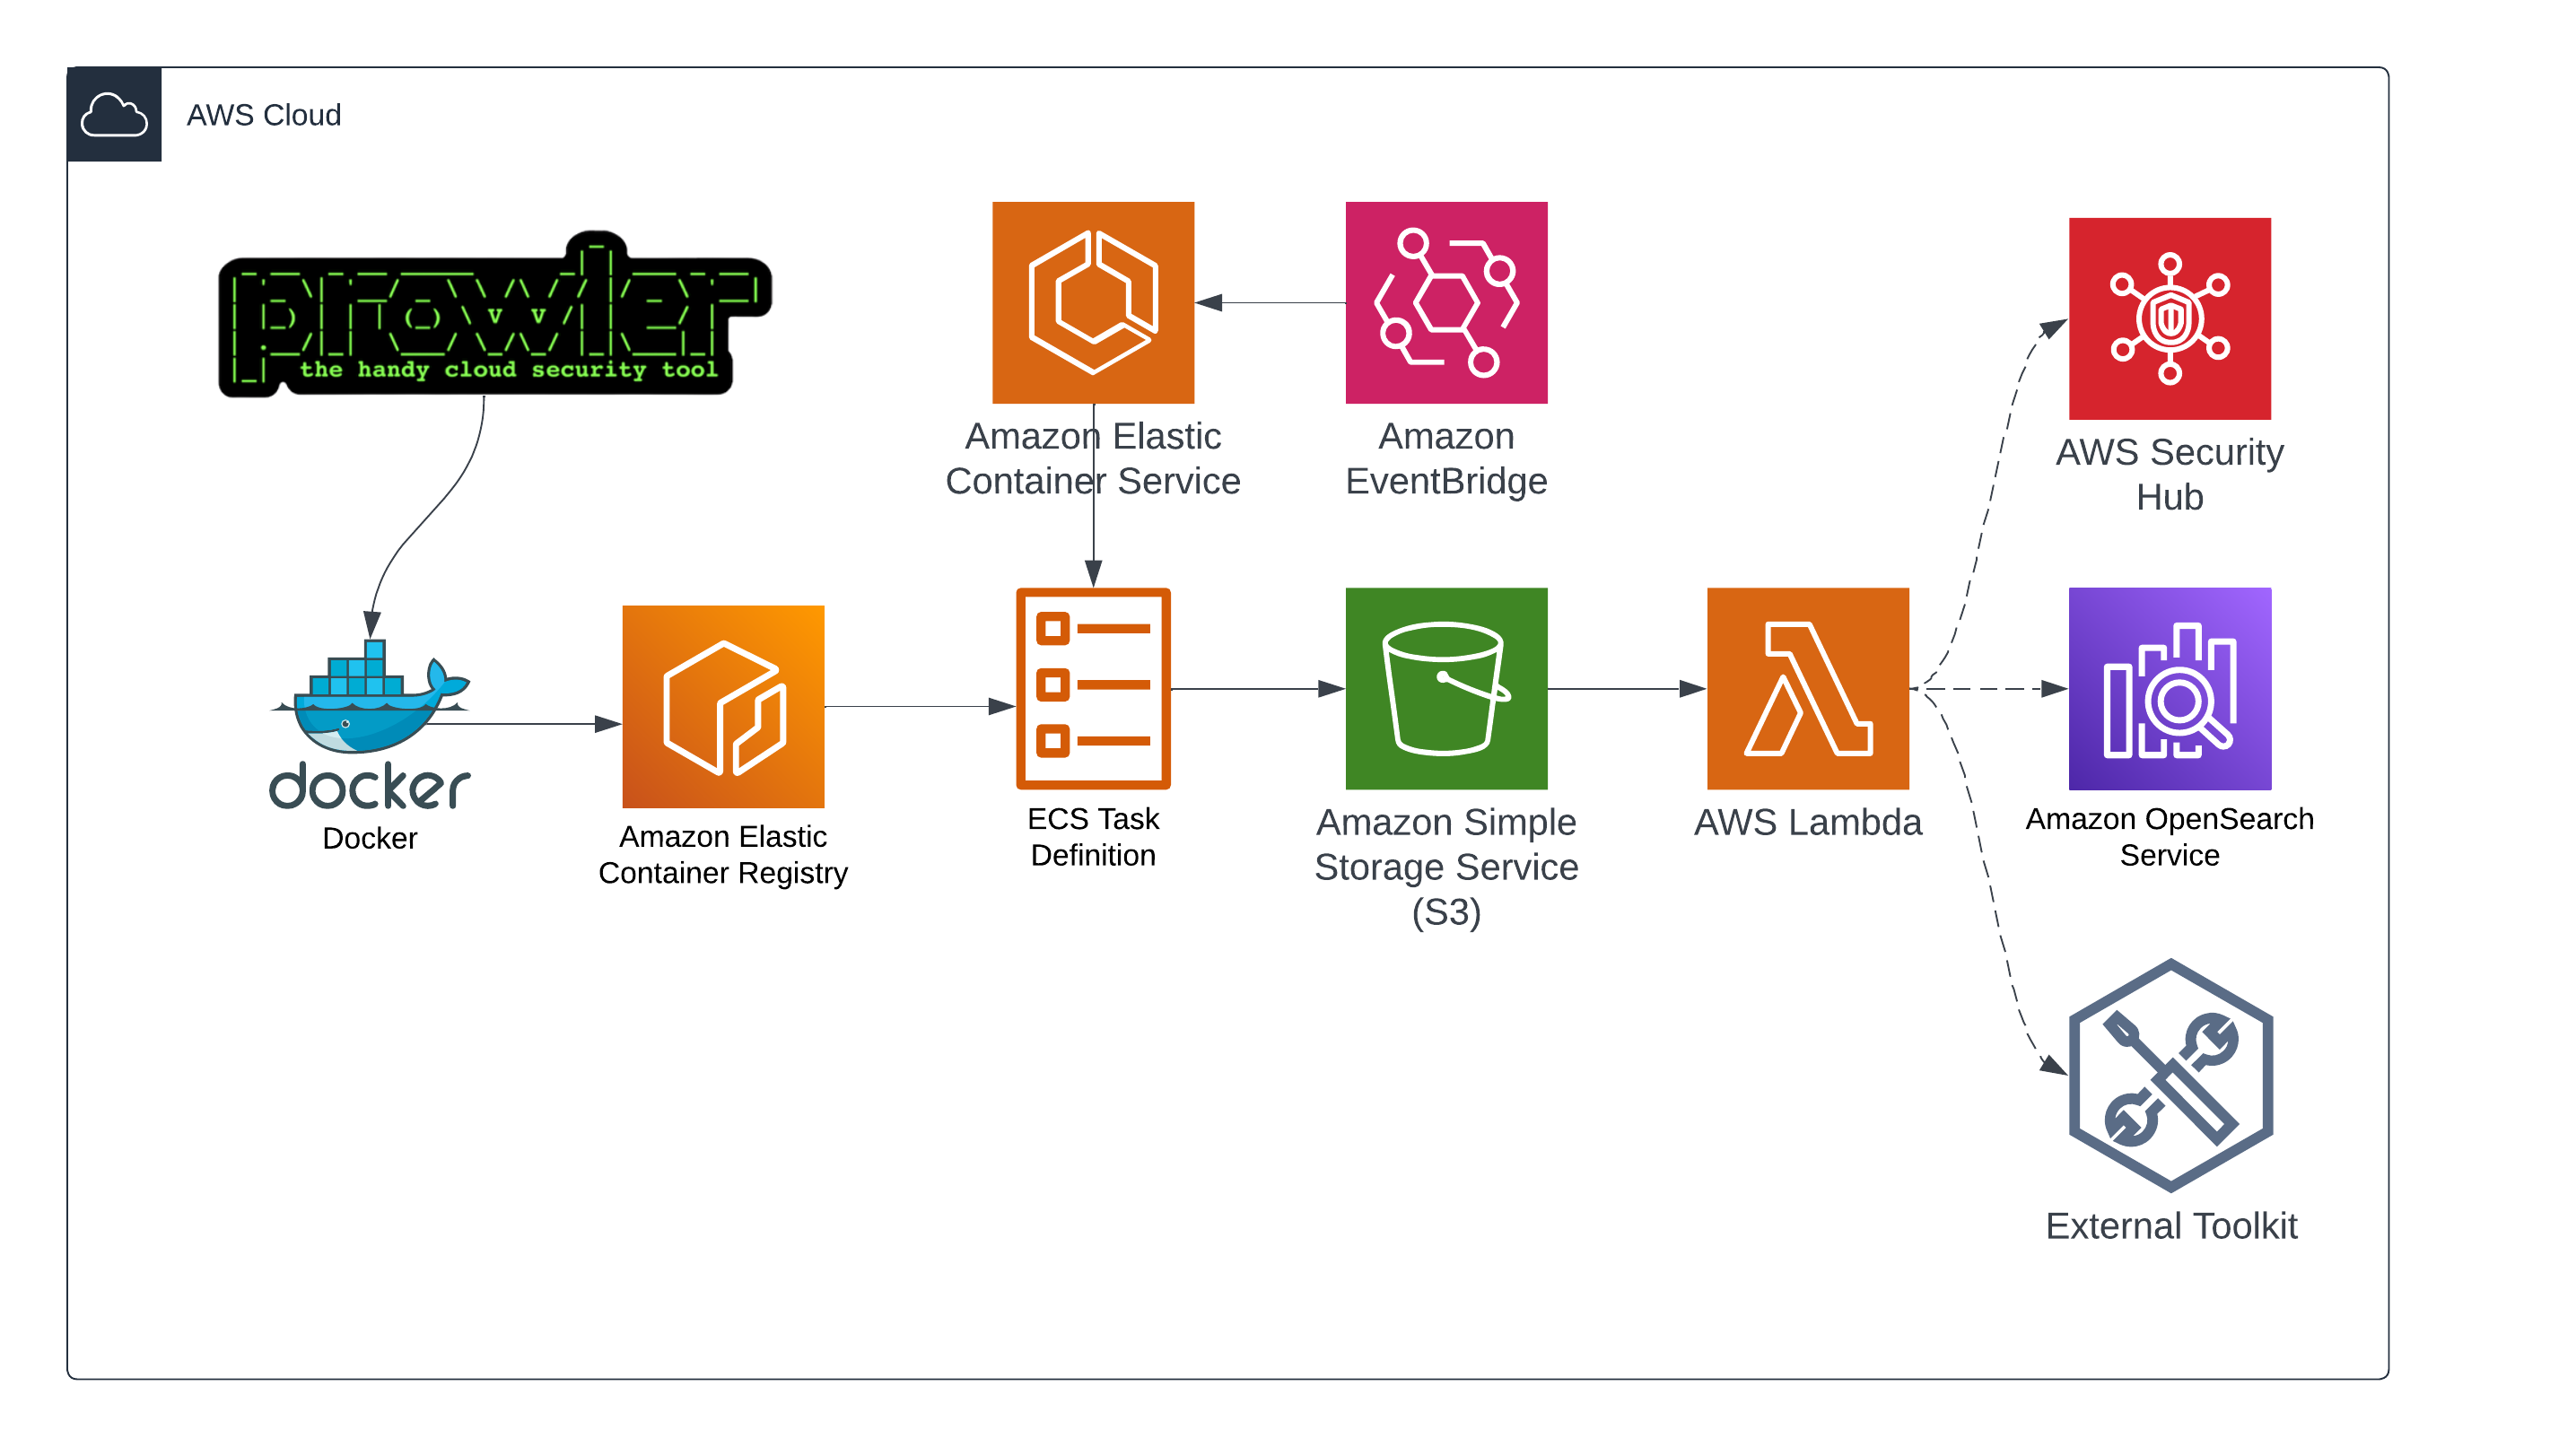
In the ever-evolving landscape of cloud security, regularly assessing your AWS environment is paramount. In this guide, we automate daily Prowler scans using Docker, AWS ECR, and ECS, pushing results seamlessly into an S3 bucket which can trigger an array of subsequent actions for data visualization and analysis. Discover the nuances of Docker configurations, the elegance of Amazon EventBridge, and the flexibility of task definitions in this comprehensive walkthrough.
Table of Contents
- Creating the Docker Container
- Setting up the ECR Registry
- Configuring the Task Definition
- Setting up the ECS Cluster
- Automating with Amazon EventBridge
Prerequisites
-
AWS Account: Active AWS account with permissions for ECR, ECS, S3, Lambda, and EventBridge.
-
Local Environment:
- Docker: For building the Prowler container.
- AWS CLI: For interacting with AWS.
- Python: Beneficial for potential testing.
-
Knowledge Base: Understand AWS basics, Docker operations, and security assessments.
-
Networking in AWS: VPCs with two subnets that can connect to the internet. (either public subnets, or private subnets with a NAT gateway)
-
IAM Setup: Roles and policies for Prowler scanning and ECS task access to S3.
-
Storage: An S3 bucket to store Prowler results and necessary configurations for any post-storage actions.
With these in place, you're ready to automate security assessments in AWS.
Creating the Docker Container
Initially, to create the docker container, you'll be using your local system, which requires the applications listed in the Prerequisite section. Create a working directory to store some files used, and pull up your preferred command line interface. In creating this guide I used bash in a Linux system.
-
Create a Dockerfile: Start by creating a new file named
Dockerfilein your project directory. -
Input the Dockerfile Content:
Add the following content to the Dockerfile:
FROM python:3.9-slim WORKDIR /prowler RUN apt-get update && apt-get install -y \ git \ awscli \ && rm -rf /var/lib/apt/lists/* RUN pip install prowler ENTRYPOINT ["prowler"] -
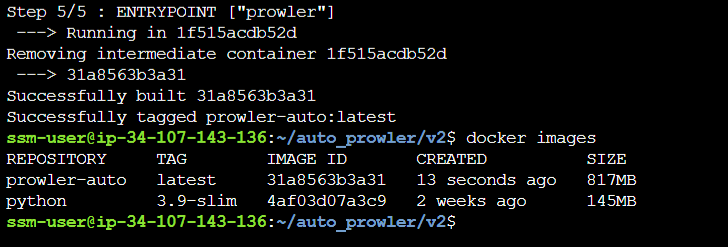
Build the Docker Image: From your project directory where the Dockerfile is located, run the following command to build the Docker image:
docker build -t prowler-auto .This command tags the Docker image with the name
prowler-auto. To verify image creation you can use the commanddocker imagesto list your available images.
-
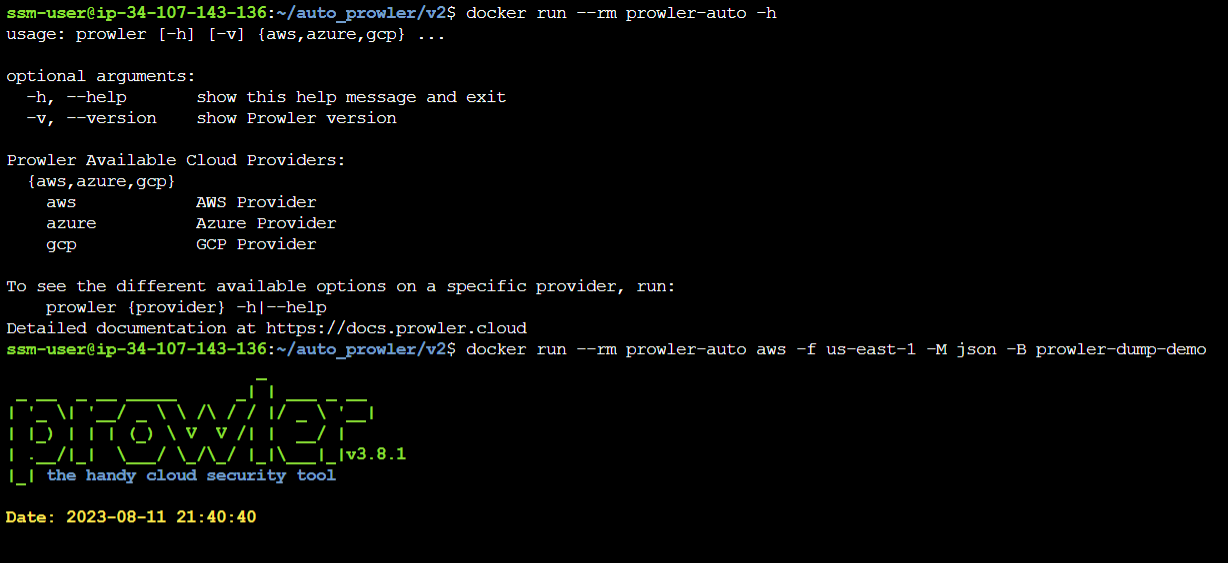
Test the Docker Container Locally: Once the Docker image is built, you can run it locally to ensure Prowler functions as expected. Use the following command:
docker run --rm prowler-auto -hThis should display the help output for Prowler, indicating that it's working properly. The --rm flag removes the container once it's done executing.
If you would like to test the container using a command similar to what you may be defining in your task definition, you can use the following command:
docker run -rm prowler-auto aws -f us-east-1 -M json -B <s3-bucket-name>Working through this command the
-rmtells docker to remove the container once it's finished executing, then the section followingprowler-autois the remainder of the prowler command we would like to run. In this case -f is the flag to indicate region, if you'd like to scan multiple regions you can list them without anything in between, i.e.-f us-east-1 us-east-2. The -M is the output formats I'm looking for, in this case only JSON, and finally -B is a built in Prowler flag for pushing scan results to an S3 bucket given a bucket name. All of this assumes you have the appropriate permissions configured for running the scan and pushing your results to an S3 bucket.
- Prepare for Next Steps: Now that your Docker container is ready, you can push it to AWS's Elastic Container Registry (ECR) in the next steps, so keep your terminal or command prompt open.
Setting up the ECR Registry
Amazon Elastic Container Registry (ECR) is a managed Docker container registry service that makes it easier for developers to store, manage, and deploy Docker container images. Follow these steps to set up the ECR registry for your Prowler Docker image:
-
Navigate to Amazon ECR:
Log in to the AWS Management Console and open the Amazon ECR console at
https://console.aws.amazon.com/ecr/. -
Create a New Repository:
- Click on
Create repository. - Provide a name for your repository, for instance,
prowler-repository. - Configure any other optional settings as needed.
- Click on
Create repository.
- Click on
Note: You can name the repository anything you'd like, but if you choose a different name be sure to update the command in the next step to reflect that change.
-
Prepare Docker for AWS ECR Login:
Before pushing the Docker image, you need to authenticate your Docker client to the Amazon ECR registry. Run the AWS CLI
get-login-passwordcommand:aws ecr get-login-password --region <your-region> | docker login --username AWS --password-stdin <your-account-id>.dkr.ecr.<your-region>.amazonaws.comReplace
<your-region>with your AWS region (in both places) and<your-account-id>with your AWS account ID. -
Tag Your Docker Image:
Before pushing, you need to tag the Docker image with the ECR repository URL:
docker tag prowler-auto:latest <your-account-id>.dkr.ecr.<your-region>.amazonaws.com/prowler-repository:latest -
Push the Docker Image to ECR:
Now, you can push your Docker image to the ECR repository:
docker push <your-account-id>.dkr.ecr.<your-region>.amazonaws.com/prowler-repository:latest

-
Verify in ECR Console:
Go back to the Amazon ECR console and navigate to your
prowler-repository. You should see your Docker image listed there.

Great! You've successfully set up an ECR registry and pushed your Prowler Docker image to it.
Configuring the ECS Task Definition
Task definitions specify the container information for your application in Amazon ECS. Follow the below steps to set up the task definition for your Prowler Docker container:
-
Navigate to Amazon ECS:
Log in to the AWS Management Console and open the Amazon ECS console at
https://console.aws.amazon.com/ecs/. -
Create a New Task Definition:
- Click on
Task Definitionsin the left navigation pane. - Click on
Create new Task Definition.
- Click on
-
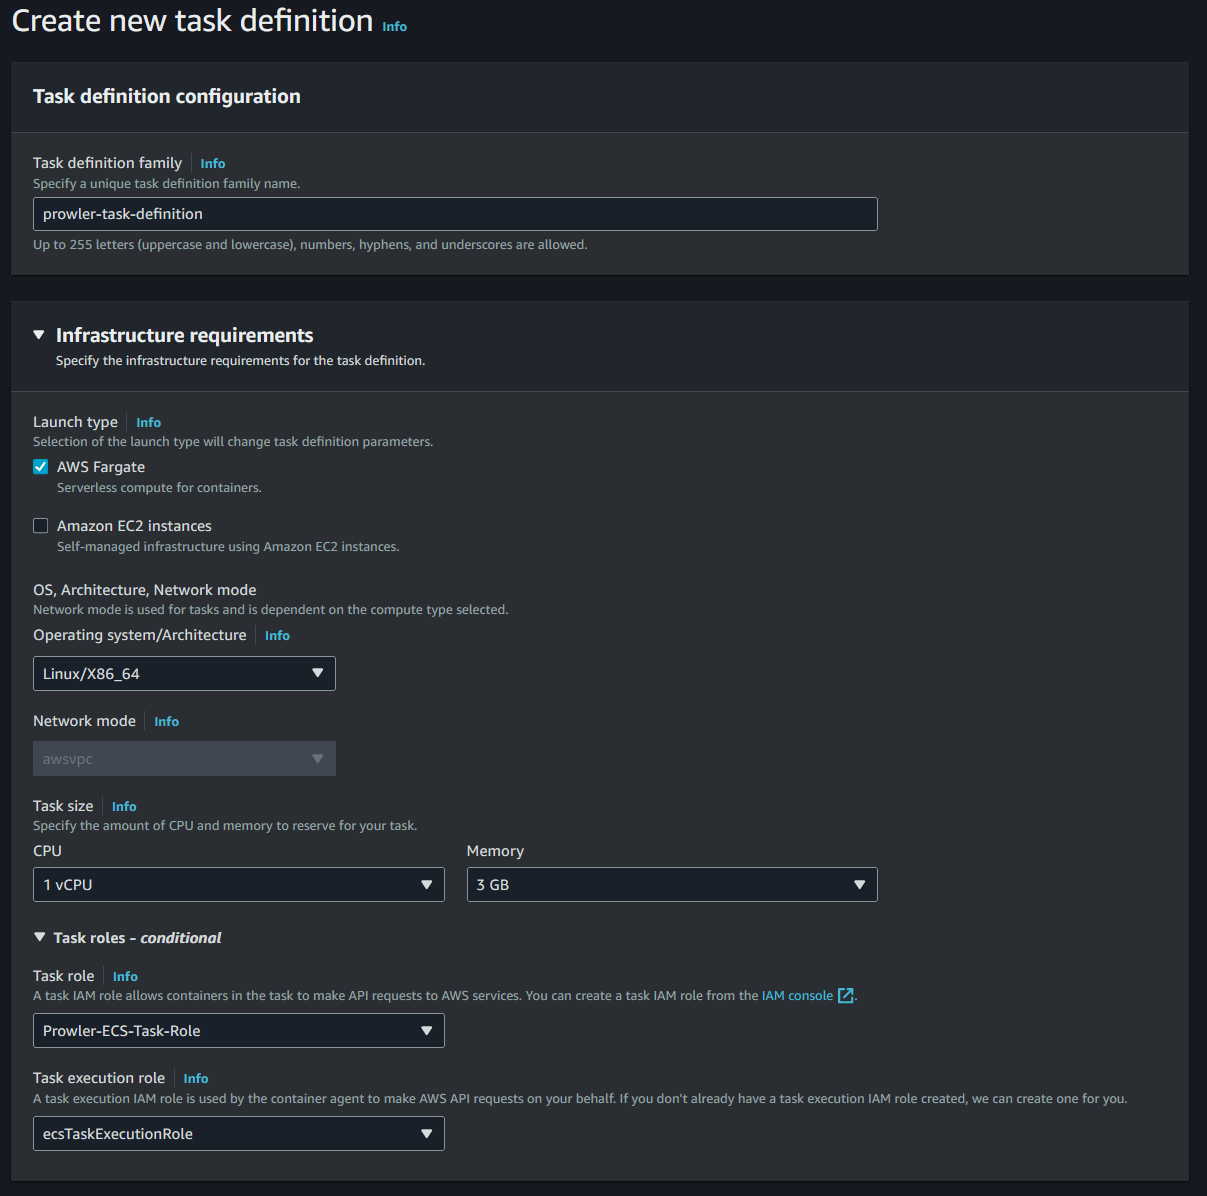
Configure Task and Container Definitions:
- Task Definition Name: Provide a name, for instance,
prowler-task-definition. - Infrastructure Requirements: Leave AWS Fargate selected, and leave everything else as the default unless you would like to adjust the CPU and Memory to your needs.
- Task Role: Select or create a new role that has the necessary permissions. Ensure this role has the three required Prowler policies and an additional custom policy to put objects into the desired S3 bucket.
- Task Execution Role: If you don't have one, AWS can create a new role with necessary permissions for you.
- Task Definition Name: Provide a name, for instance,
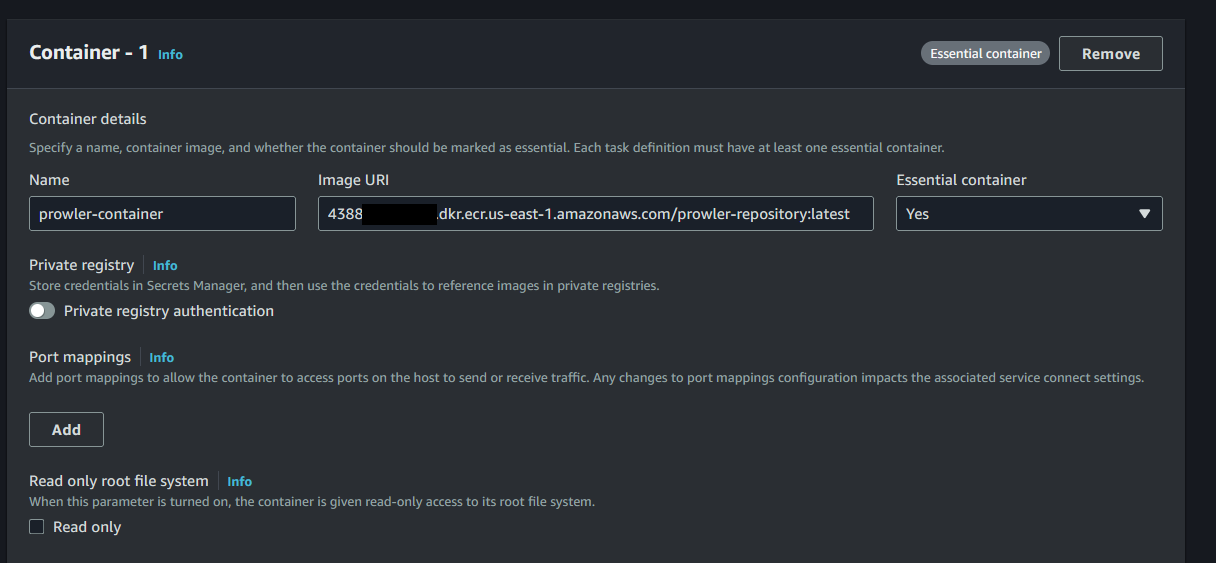
- Container Definitions:
- Name:
prowler-container. - Image URI: Provide the URL of the Docker image in ECR, e.g.,
<your-account-id>.dkr.ecr.<your-region>.amazonaws.com/prowler-repository:latest. - Port Mappings: Click
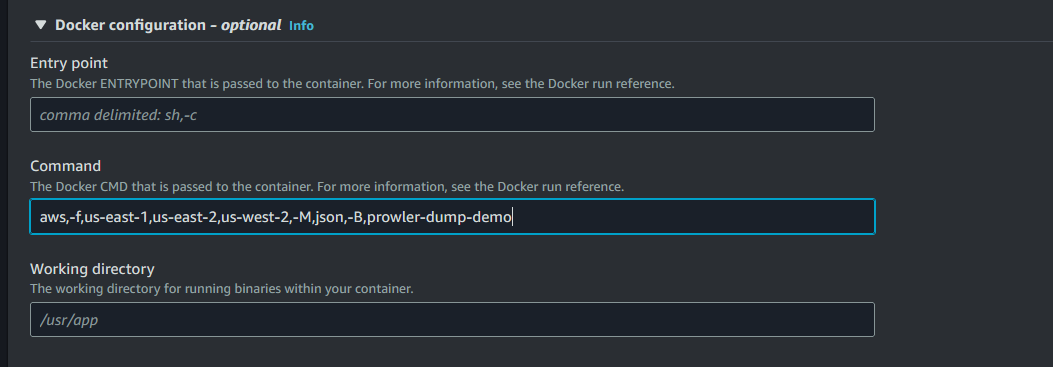
Removenext to the default container port mapping as this container does not need to expose any ports for inbound traffic. - Docker Configuration: Click out on Docker configuration and specify your desired Prowler command in a comma-separated list, for example
aws,-f,us-east-1,us-east-2,us-west-2,-M,json,-B,<my-bucket-name>.
- Name:
Note: A convenience of defining the command here and not within the docker container is that when we set up the EventBridge scheduler we can point it at the "latest" revision of this task definition. If you ever need to update what prowler is scanning or where it's being pushed you simply create a new task definition revision and change this command to reflect your updated needs.
- Once all details are filled, click
Create.
-
Verify Task Definition:
Go back to the ECS console and navigate to
Task Definitions. You should see yourprowler-task-definitionlisted there.
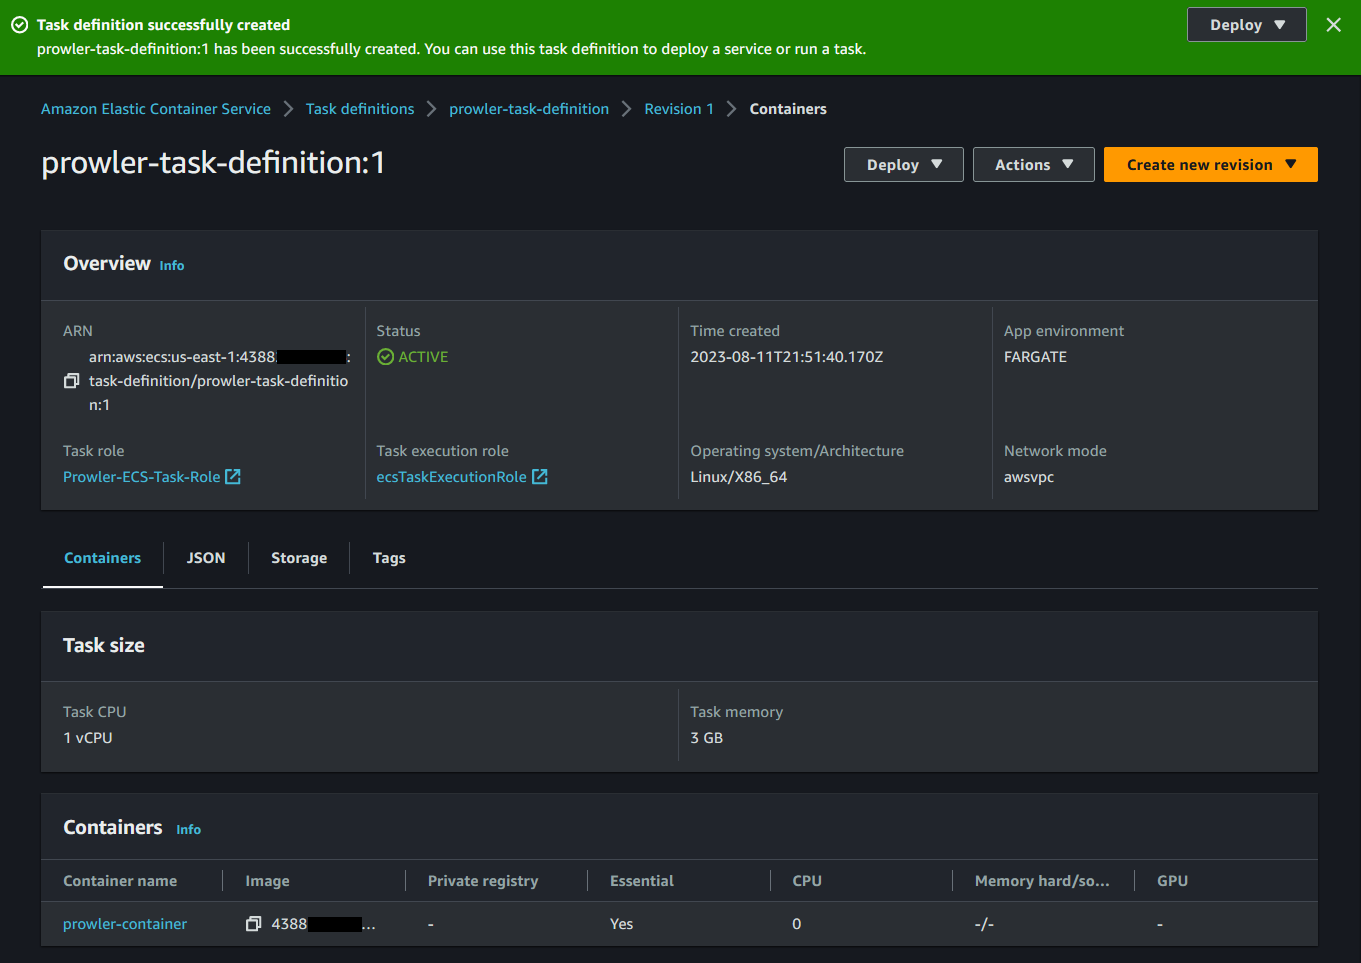
You've now configured an ECS Task Definition ready to run Prowler scans using your Docker container.
Setting Up the ECS Cluster
Amazon Elastic Container Service (ECS) clusters enable you to manage and scale a fleet of Docker containers. By setting up an ECS Cluster, you create an environment where you can deploy the Prowler scans.
-
Navigate to Amazon ECS:
Log in to the AWS Management Console and open the Amazon ECS console at
https://console.aws.amazon.com/ecs/. -
Initiate Cluster Creation:
- Click on
Clustersin the left navigation pane. - Click on the
Create Clusterbutton.
- Click on
-
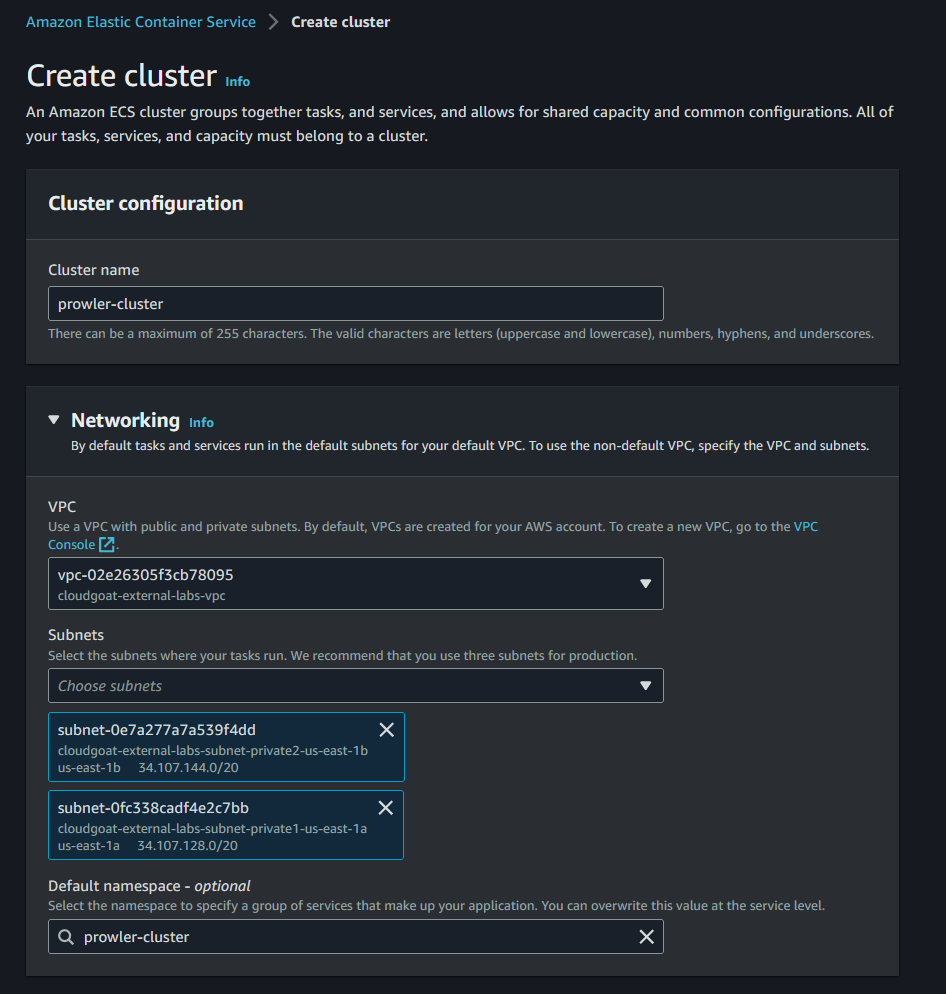
Name the Cluster and Configure Networking:
- Provide a suitable name for your cluster, e.g.,
prowler-cluster. - Choose an existing VPC and select the appropriate subnets.
- Provide a suitable name for your cluster, e.g.,
-
Choose Infrastructure:
- Under "Infrastructure," leave the default selection as
AWS Fargate.
- Under "Infrastructure," leave the default selection as
-
Skip Additional Configurations:
- Scroll down and adjust any other configurations you'd like to, but beyond this all of the defaults should work.
-
Create the Cluster:
- Review your configurations, and then click on the
Createbutton.
- Review your configurations, and then click on the
-
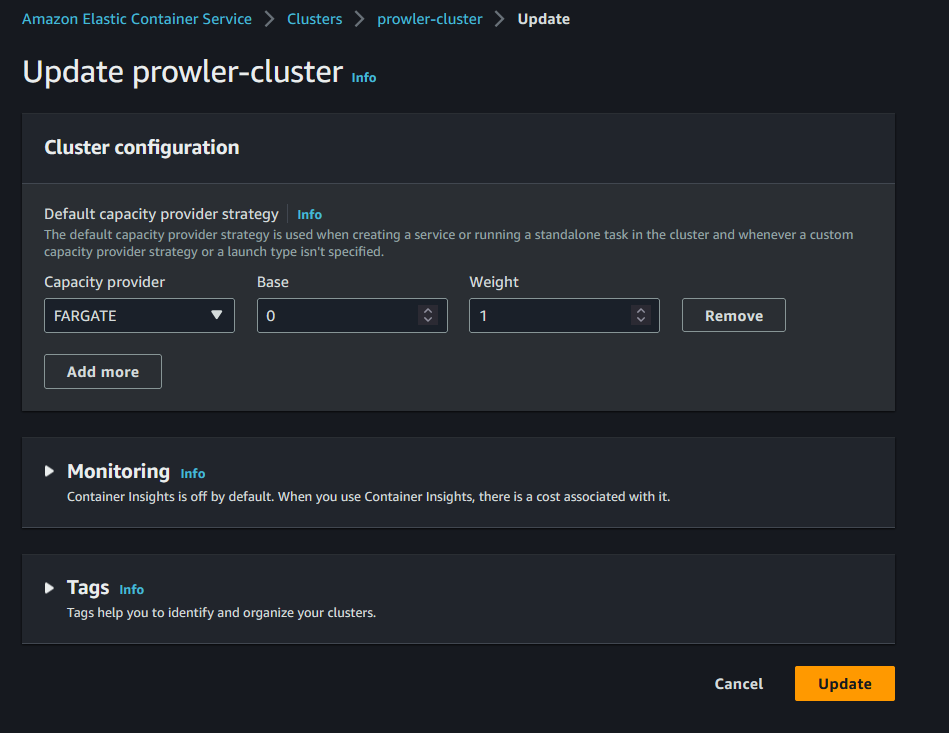
Set Default Capacity Provider Strategy:
- Once the cluster is created, click on its name to view its details.
- Click on the "Update Cluster" button in the top right corner.
- Define a default capacity provider strategy. Select
FARGATEand leave the weight as1. - Click
Update.
-
Verify Cluster Creation:
Return to the
Clusterspage. Your newly createdprowler-clustershould now be listed.
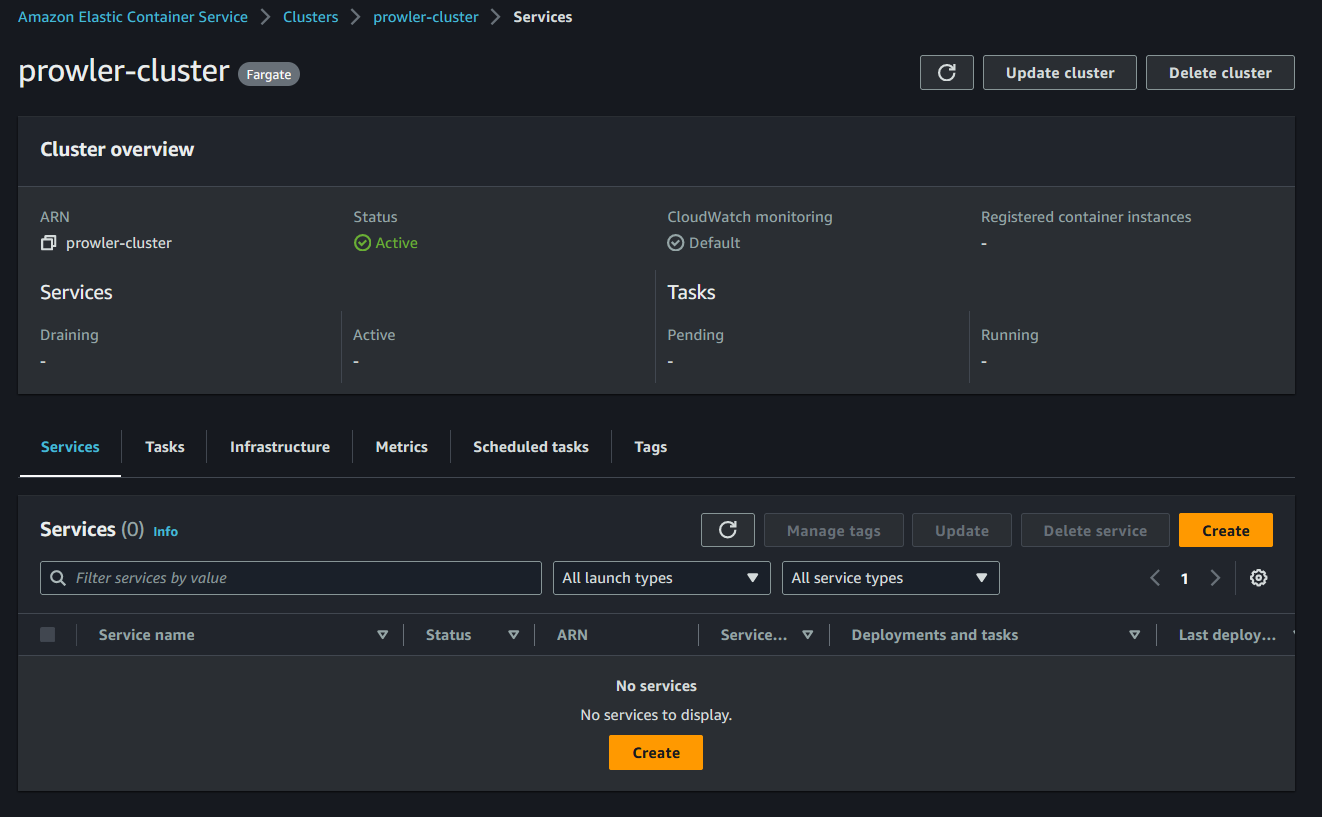
Your ECS cluster is set up with a defined default capacity provider strategy and is prepared to run tasks.
Automating with Amazon EventBridge
Amazon EventBridge is a serverless event bus service that allows easy connection between applications using data from your applications, AWS services, and integrated SaaS applications. We'll utilize EventBridge to automate the execution of our Prowler task on ECS at specified intervals.
-
Navigate to Amazon EventBridge:
Log in to the AWS Management Console and open the Amazon EventBridge console at
https://console.aws.amazon.com/events/. Then scroll down and clickSchedulesunder the "Scheduler" feature. -
Create a New Schedule:
- Click on
Create schedule. - Provide a name and description for your schedule, e.g.,
ProwlerScanScheduler.
- Click on
-
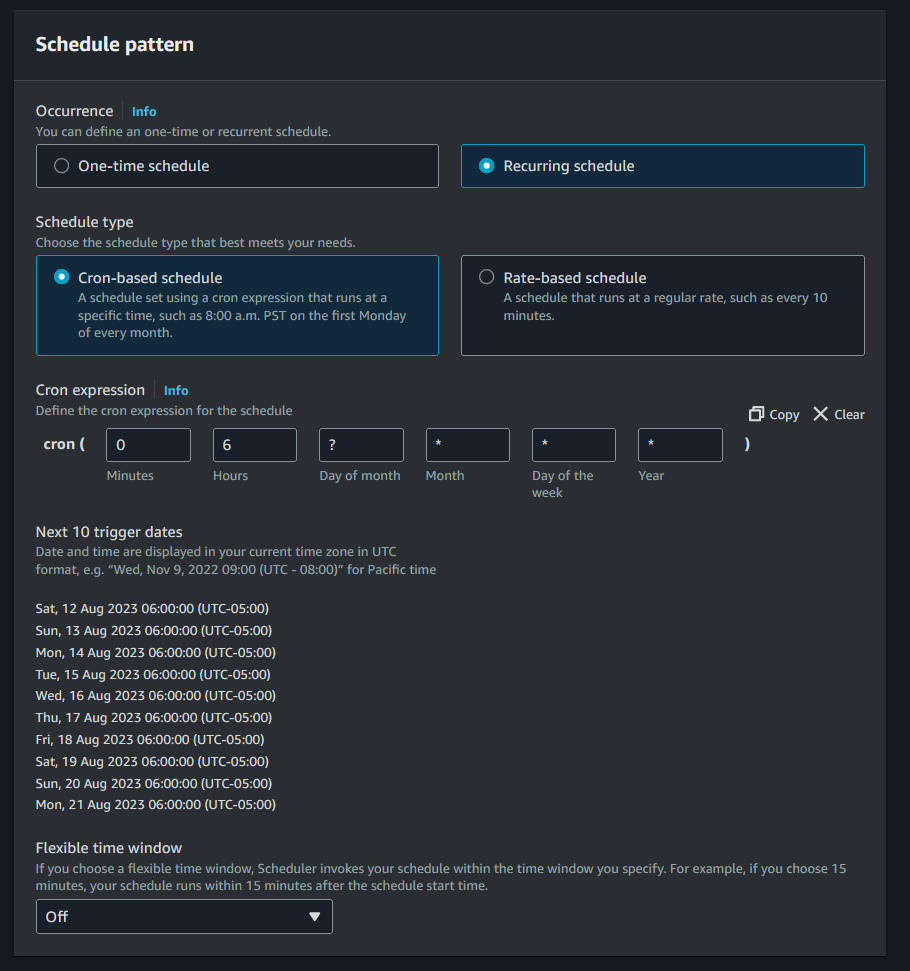
Define Schedule Pattern:
- Under
Schedule pattern, selectRecurring schedule. - For daily scans at 6 AM, set the cron expression as
0 6 ? * * *, and choose any Flexible time window per your needs. - If you'd like to define date ranges for the scans to start or stop, enter those, otherwise leave it blank and click
Next.
- Under
-
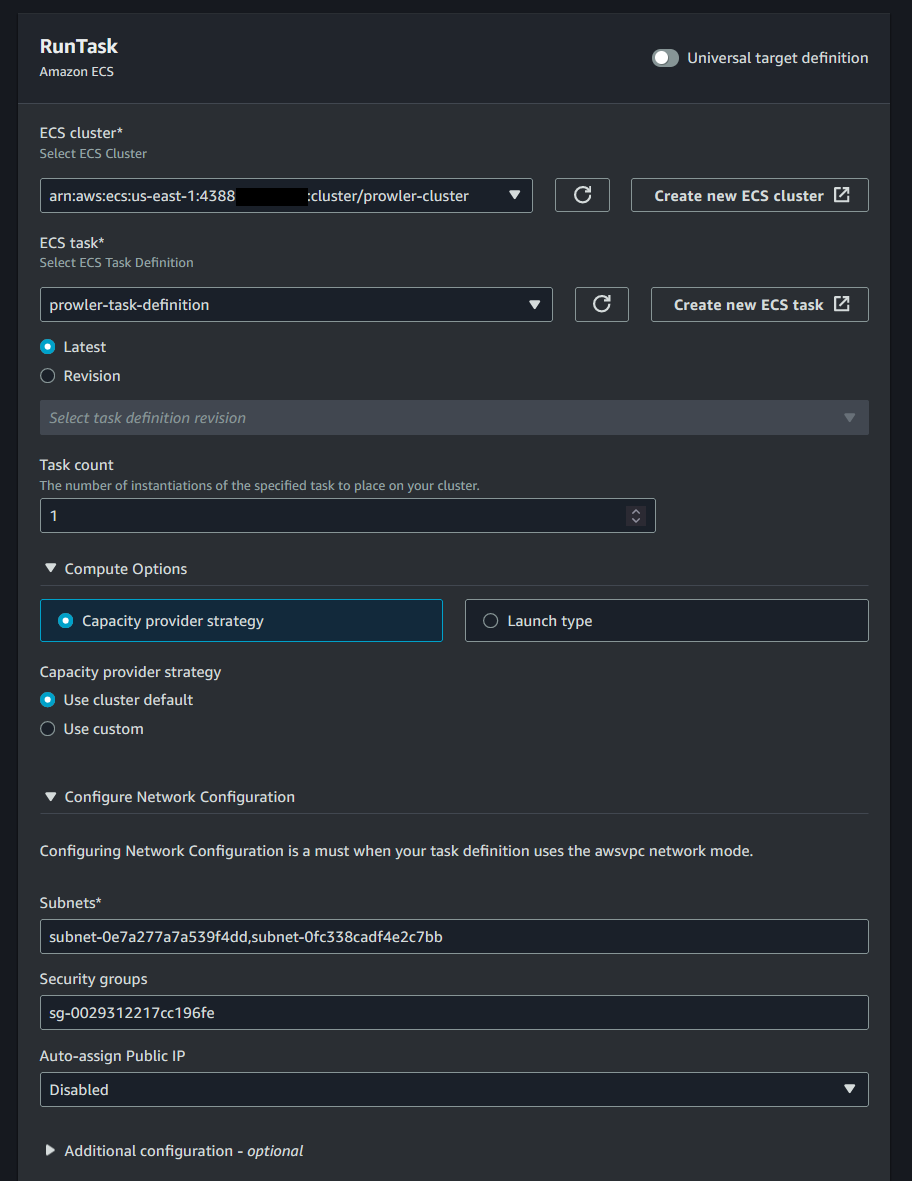
Select Target:
- Under
Select targets, chooseECS RunTaskfrom the menu. - For
Cluster, select the ECS cluster you've previously set up, e.g.,prowler-cluster. - For
Task Definition, select your Prowler task definition, e.g.,prowler-task-definition. - Under
SubnetsandSecurity groups, specify the subnet and security group ID's. As a reminder, you can use private subnets if they have internet access via a NAT Gateway. In this case the security group doesn't need any inbound rules and should just have the default outbound rule.
- Under
-
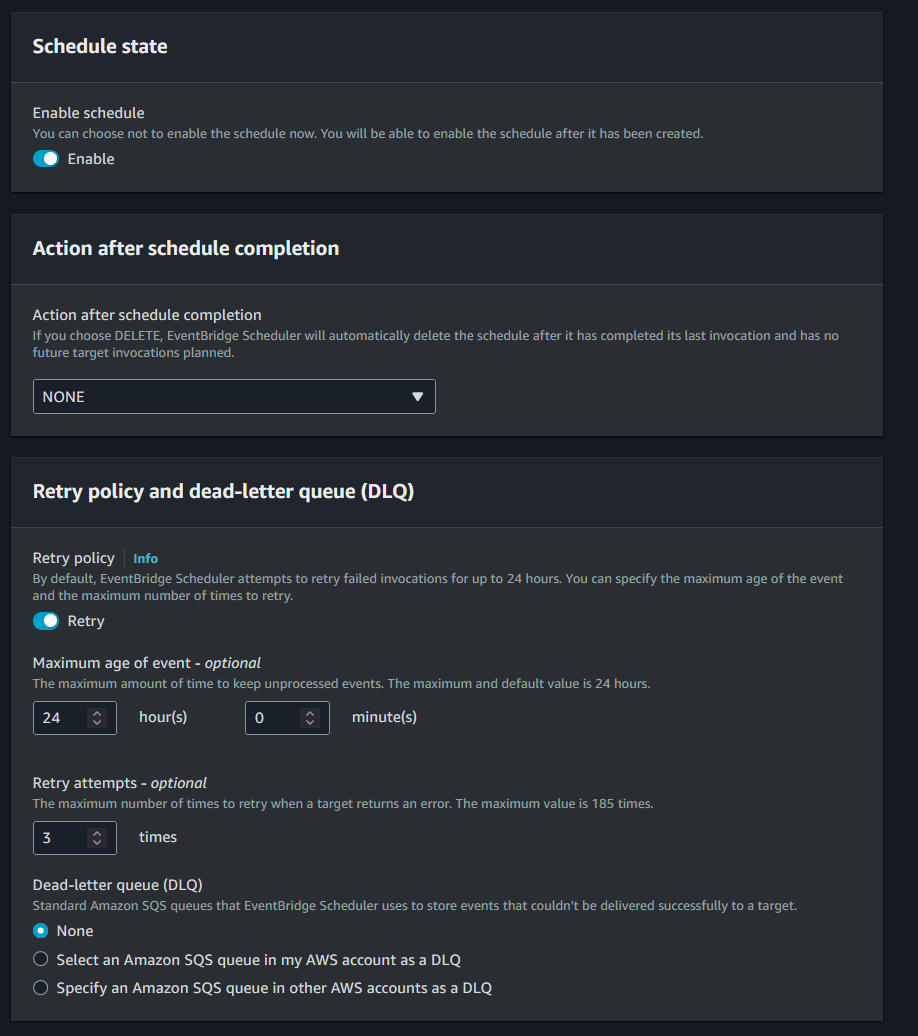
Configure Retry Policy (Optional):
If you wish to retry the execution in case of failures, you can set the
Retry policy. In this guide, we're setting it to try 3 times.
-
Set Role:
Near the bottom of the page we can create or choose a role for the scheduler to use to run the task definition. In this case the role that is created automatically by choosing
Create new roleis a good choice. -
Create the Rule:
Click
Nextthen review all your configurations and then click on theCreatebutton. -
Verify Rule Creation:
Return to the main EventBridge dashboard and ensure your
ProwlerScanSchedulerrule is listed.
Congratulations! You've now automated the execution of your Prowler scan task in ECS using Amazon EventBridge. The task will automatically run every day at 6 AM.
Conclusion
In this guide, we've successfully crafted a system that automates Prowler scans within an AWS environment, efficiently storing the results in an S3 bucket through a streamlined Docker container and ECS task setup. Utilizing EventBridge, we've ensured consistent daily evaluations, providing a dynamic lens into our AWS security posture. Looking forward, the architecture's true power can be unlocked by integrating AWS Lambda. Such a function, triggered by new objects in our S3 bucket, offers the capability to push these Prowler results to various consumers, from AWS's SecurityHub or OpenSearch, or to external visualization tools, magnifying our insights and fortifying our cloud security.
